Stable Diffusion
Introduction #
Stable Diffusion is a latent text-to-image diffusion that uses machine learning to generate images. It was developed by StabilityAI in collaboration with several research institutions and was released in 2022. Stable Diffusion is open-source and can be used for free.
It is primarily used to generate detailed images conditioned on text descriptions. However, it can also be applied to other tasks such as inpainting, outpainting, and generating image-to-image translations, animations, videos, and image-to-audio transformations.
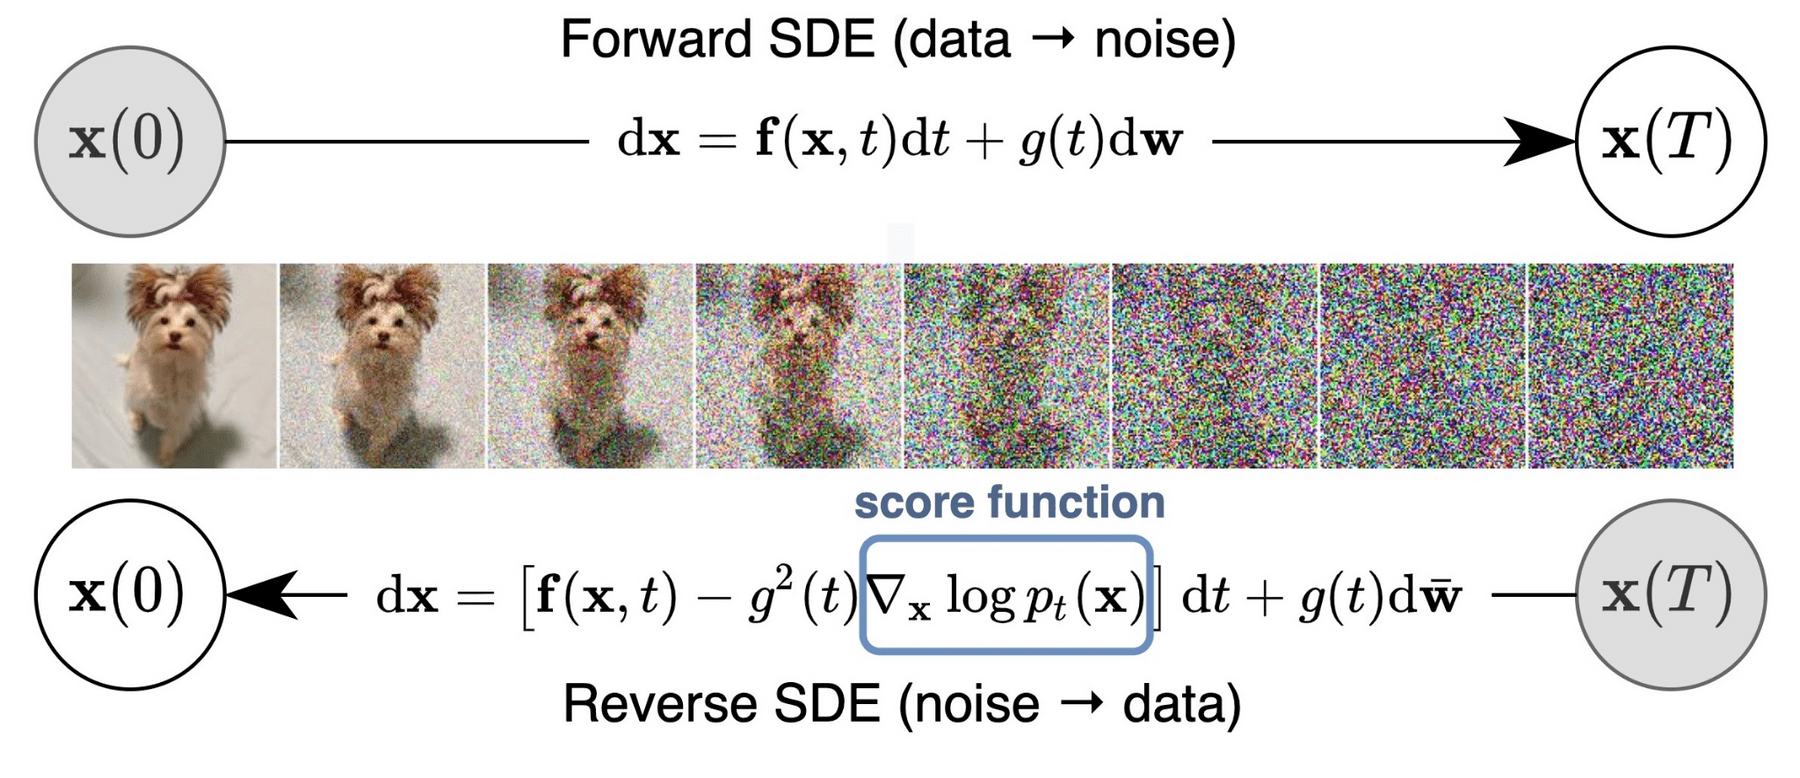
It works by diffusing noise over a series of steps. The model uses a text encoder to encode the input text into a latent space (representation of data), which is then used to generate the image by reversing the initial noise or “diffusing” an image. Different noise decoders (samplers) produce different results, which can achieve various aesthetic goals. This differs from a more traditional GAN approach (which involves two networks competing against each other) because the process is faster and yields more accurate results.
The process works with noise seeds, similar to generative art systems, which can be used to “lock” the latent space in order to produce consistent results. This is useful for animation, where the same seed can be used to generate a sequence of images.
Similarly, the diffusion process can be trained. This is useful for generating images that are consistent with a given text description or for generating images that are consistent with a set of images that have not been previously encoded into the model. Different models contain different knowledge and can be used to generate varied results.
More information about Stable Diffusion and how it works can be found here:
- Stable Diffusion Original Release
- Latent Diffusion Models
- Diffusion vs GANs
- How Diffusion Models Work
- How Stable Diffusion Works
- Stability AI
Note on Ethics #
Stable Diffusion, is a breakthrough in generative AI. This tool offers potentially anyone, revolutionary tool to visualize concepts, create new pieces of art, animations, and many more possiblities in many different sectors. However, its power also comes with ethical challenges. While it can catalyze creativity, there’s potential for misuse in creating harmful or misleading content.
The developers and researches expect that the individuals that use Stable Diffusion can understand the potential consequences of their actions and make informed decisions e.g., creating images depicting that can be too explicit, or creating images that could fall into copyright and claim them as the owner (these are ongoing discussions within the larger community). It’s essential to remember that not everyone will approach this technology with the same level of prudence.
Hence, it’s imperative for users to be conscious of their actions and the content they generate. As we embrace this addition to the AI-generated media landscape, it’s crucial to approach its use with responsibility, ensuring that technological advancements align with societal values and safety.
Installation #
The base configuration of Stable Diffusion is designed to be modular, open-source, and user-friendly. It can be further extended with additional models and features. This has led to the development of several solutions built on top of the base Stable Diffusion code.
This tutorial will focus on Automatic 1111 on windows. More information about other open-source solutions, and how to run Stable Diffusion in other operating systems can be found in the links provided below:
Automatic 1111 on Windows #
Automatic 1111 is a browser interface based on Gradio library for Stable Diffusion. It is the most popular and extendable solution for Stable Diffusion. Automatic 1111 has hundreds of extensions and a large community of users, that are constantly developing new models and features.
The general installation guide and repo is here Automatic 1111.
The following are instructions for windows, for other operating systems, please refer to the Automatic 1111 on Mac and Automatic 1111 on Linux.
To install Automatic 1111 on a PC, there are certain prerequisites. Ensure you have Python 3.8 or higher and Git installed. If you don’t have these, please install them first. You can obtain them from the following links:
Then, rowse to your desired folder, open the terminal in that folder (by typing cmd on the address bar in the explorer), and then clone the repository by typing the following command:
git clone https://github.com/AUTOMATIC1111/stable-diffusion-webui.git
This wil create a folder called stable-diffusion-webui. Now browse into that folder and open the file called:
webui-user.bat
Now the system should start.
You can create a shortcut to the webui-user.bat file and place it on your desktop for easy access. More info here.
Audiovisual Studio Workshop #
Automatic 1111 is installed on the computers in the room H003 in the Väre buidling. You do not need to install anything in these computers.
To start the program browse to the folder below and open the file called webui-user.bat:
C:\Programs\automatic1111\stable-diffusion-webui
The outputs are in the root folder of the program:
stable-diffusion-webui\outputs
Prompt Engineering #
The underlying system that interprets the text input into Stable Diffusion is named CLIP. This is a neural network trained to understand both text and images. It’s an incredibly potent system but is sensitive to the phrasing of our prompts. Concepts are often separated by commas, and the system attempts to generate an image encompassing all these concepts. Sometimes, these are referred to as tokens. Hence, it’s crucial to craft prompts that will yield the desired results.
This means that descriptions must be tailored in a manner that the system comprehends. Achieving this isn’t always straightforward and demands practice. Here are some tips to help you craft effective prompts:
- Be as descriptive and direct as possible.
- Use simple language and concise sentences.
- Overly lengthy prompts can compromise results as they might start converging.
- Use text weight to emphasize the “importance of a word” in the prompt.
- Employ negative prompts to steer the generation away from certain concepts.
Use parentheses to increase the importance, for example: (dog), ((dog)), (((dog))). Each parenthesis increases the importance of that word by 1.1 times. Use brackets to decrease the importance, for example: [dog], [[dog]], [[[dog]]]. Each bracket diminishes the importance of that word by 0.9 times. Alternatively, you can assign the importance of the word directly using a number, for example: (dog:1.5), (dog:0.5).
In Automatic 1111 and similar solutions, there are always two boxes for prompting: one for the “normal” or positive prompt and another for the negative prompt.
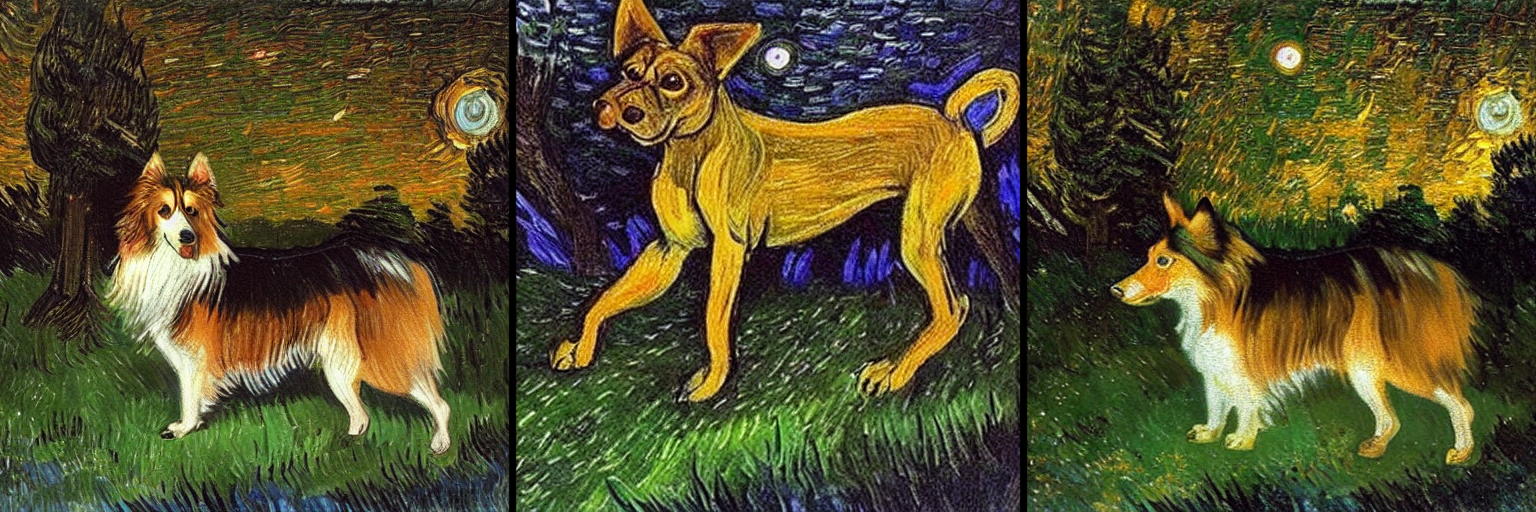
An example of a good prompt would be:
A painting of a dog in a forest, by Van Gogh, at night
An example of a bad prompt would be:
I want a painting of a dog painted by van gogh in a forest at night. I want it to be realistic too and maybe with some lights
An example of a prompt with text weights and negative prompt too would be:
A painting of a dog in a forest, by Van Gogh, at night
negative: cartoon, drawing, sketch, illustration, 2 dogs, deformed
You can find more detailed information about prompt engineering here:
- Stable Diffusion Prompt Guide for Beginners
- Stable Diffusion prompt: a definitive guide
- The Ultimate Prompt Guide
- Stable Diffusion Good Prompts
ChatGPT #
We could also query ChatGPT or Bing Chat (which is more up-to-date) about the prompt we want to use. This can be useful to get a better understanding of the prompt, and to get some ideas about what we can write. This way we could have a better idea of what the system can understand. There are some extensions that can be integrated into Automatic 1111 that can use ChatGPT to generate prompts withing the interface. In the Extensions section you can find more information about this.
Interface and Parameters #
General #
The following are the basic fields and button that are found on the top of the interface:
-
Model: Select the model you want to use. The default model is SD 1.5 (it could have another name in your machine), which is the base model released by Stability AI. However, there are other models that can be used for different purposes. You can click the reload button to refresh the list of models.
-
Prompt: The text prompt that will be used to generate the image.
-
Negative Prompt: The negative prompt that will be used to steer the diffusion process away from certain concepts.
-
Generate: This button will start the diffusion process. The process will take some time, depending on the model and the parameters used, and on the hardware in your machine.
if you right-click the Generate button you can get some extra options, like generate forever.
- Interrupt: You can click this button to stop the process.
The buttons under the Generate buttun are useful to save your prompts, which can then be reused later. These are called styles in Automatic 1111You can also load prompts from a file. Styles allow you to add custom text to prompt. Use the {prompt} token in style text, and it will be replaced with user’s prompt when applying style. Otherwise, style’s text will be added to the end of the prompt.
The tabs serve different purposes. The main tabs are txt2img, img2img, Extras, Settings and Extensions. Each of these tabs has different parameters and options.
There are some secondary tabs including generation, textual inversion, hypernetworks, checkpoints, and Lora. These tabs contain the models that we use for our generations. Its mostly used as a browser so we can easily access the models in our machine.
You can only execute 1 process at at time. That meas that if you generate a new iamge from the txt2img tab, you cannot do any other process in the meantime.
All the outputs by default are saved in the stable-diffusion-webui\outputs folder. You can easliy access the outputs folder by clicking the folder icon under the resulting image after your generation is complete. You can laso change this folder path in the settings tab.
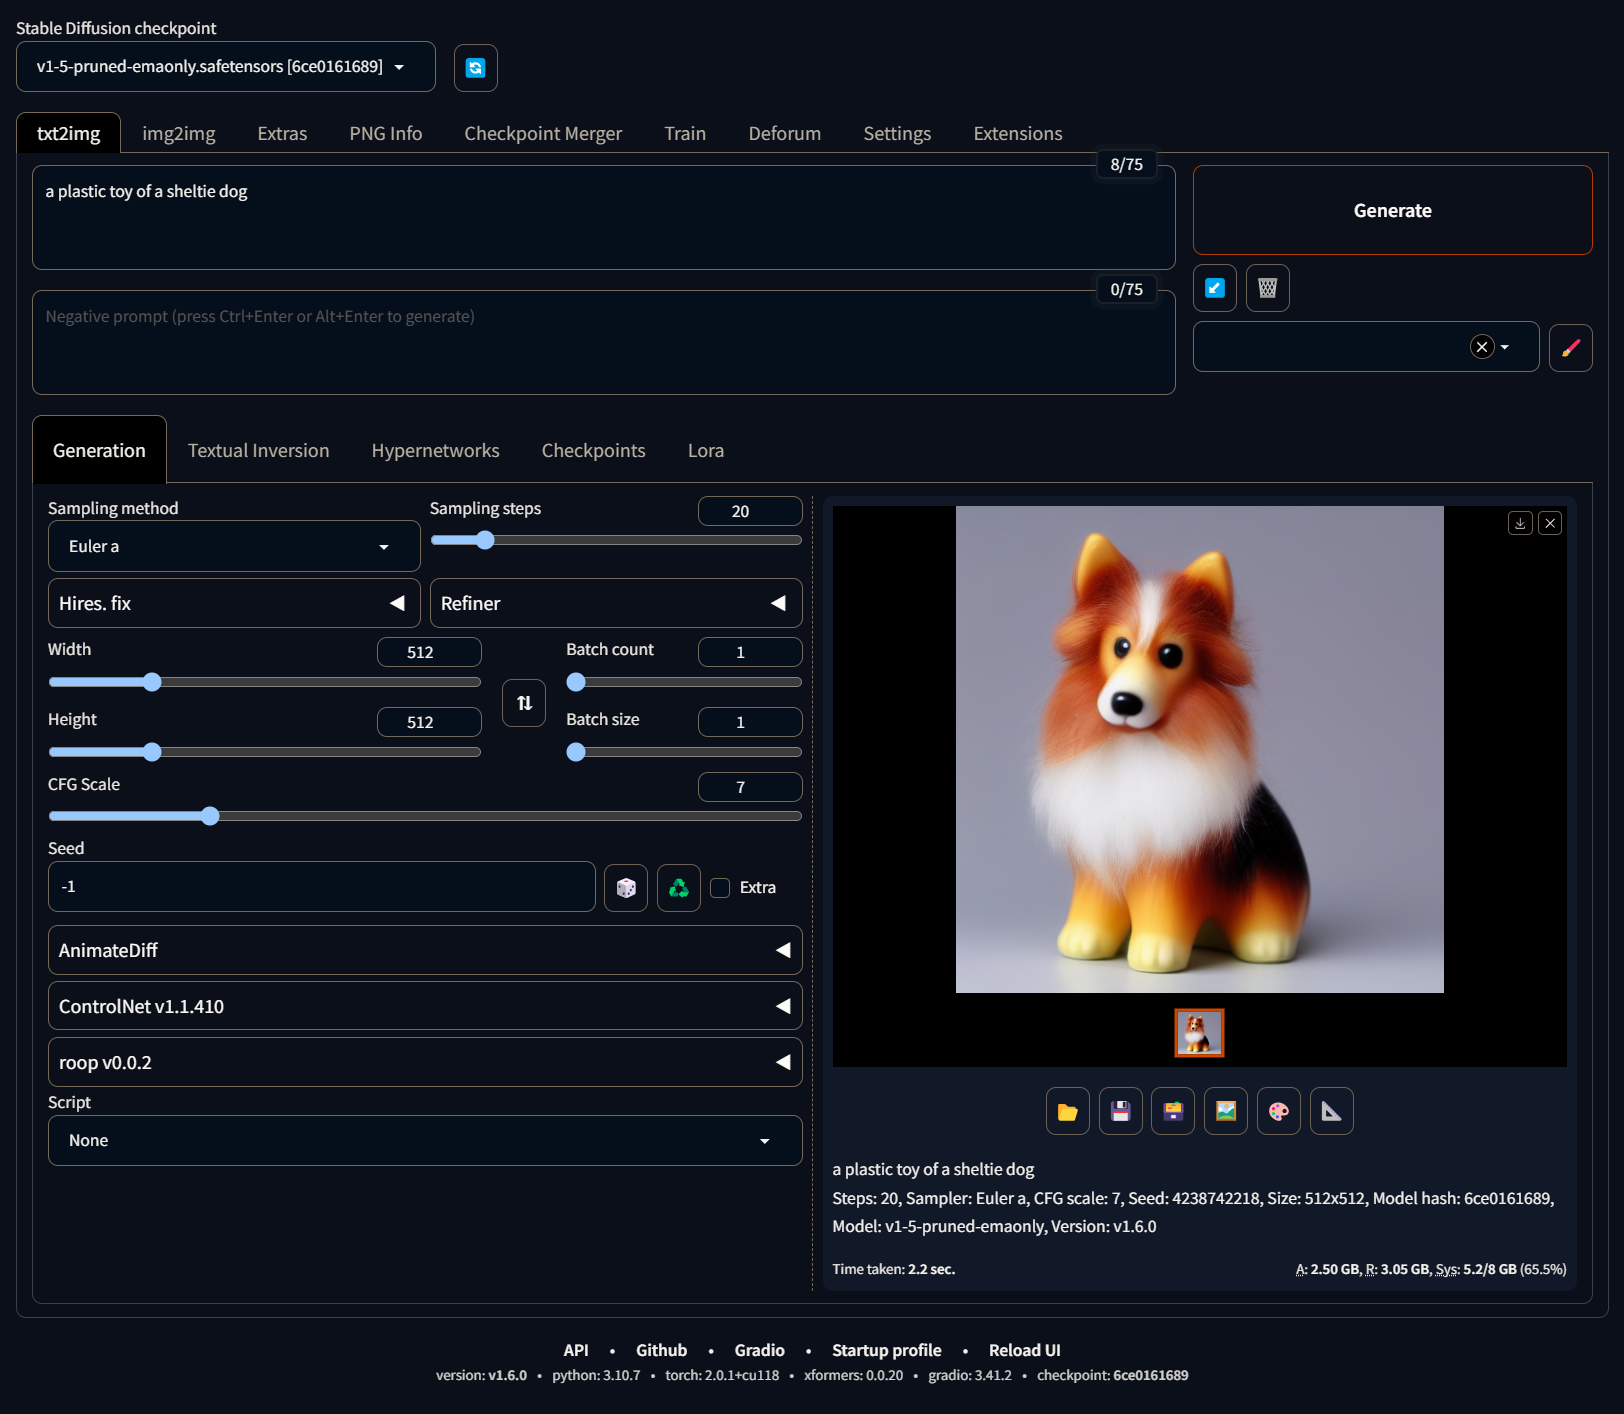
Txt2Img #
The txt2img tab is used to generate images from text. The following are the fields and buttons that are found in this tab:
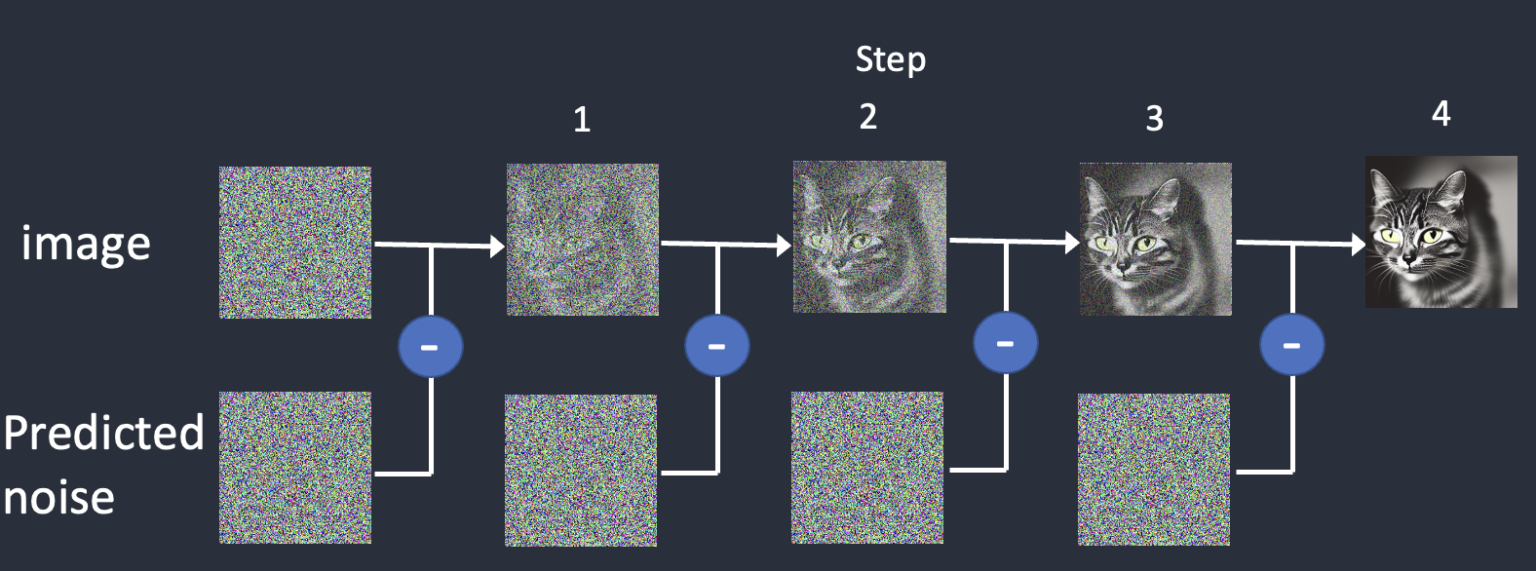
- Sampling Method: To produce an image, Stable Diffusion first generates a completely random noisy image in the latent space. The noise predictor then estimates the noise of the image. The predicted noise is subtracted from the image. This process is repeated a dozen times. In the end, you get a clean image. This denoising process is called sampling because Stable Diffusion generates a new sample image in each step. The functions used in sampling is called the sampler or sampling method. You can change the method using the drop-down menu.
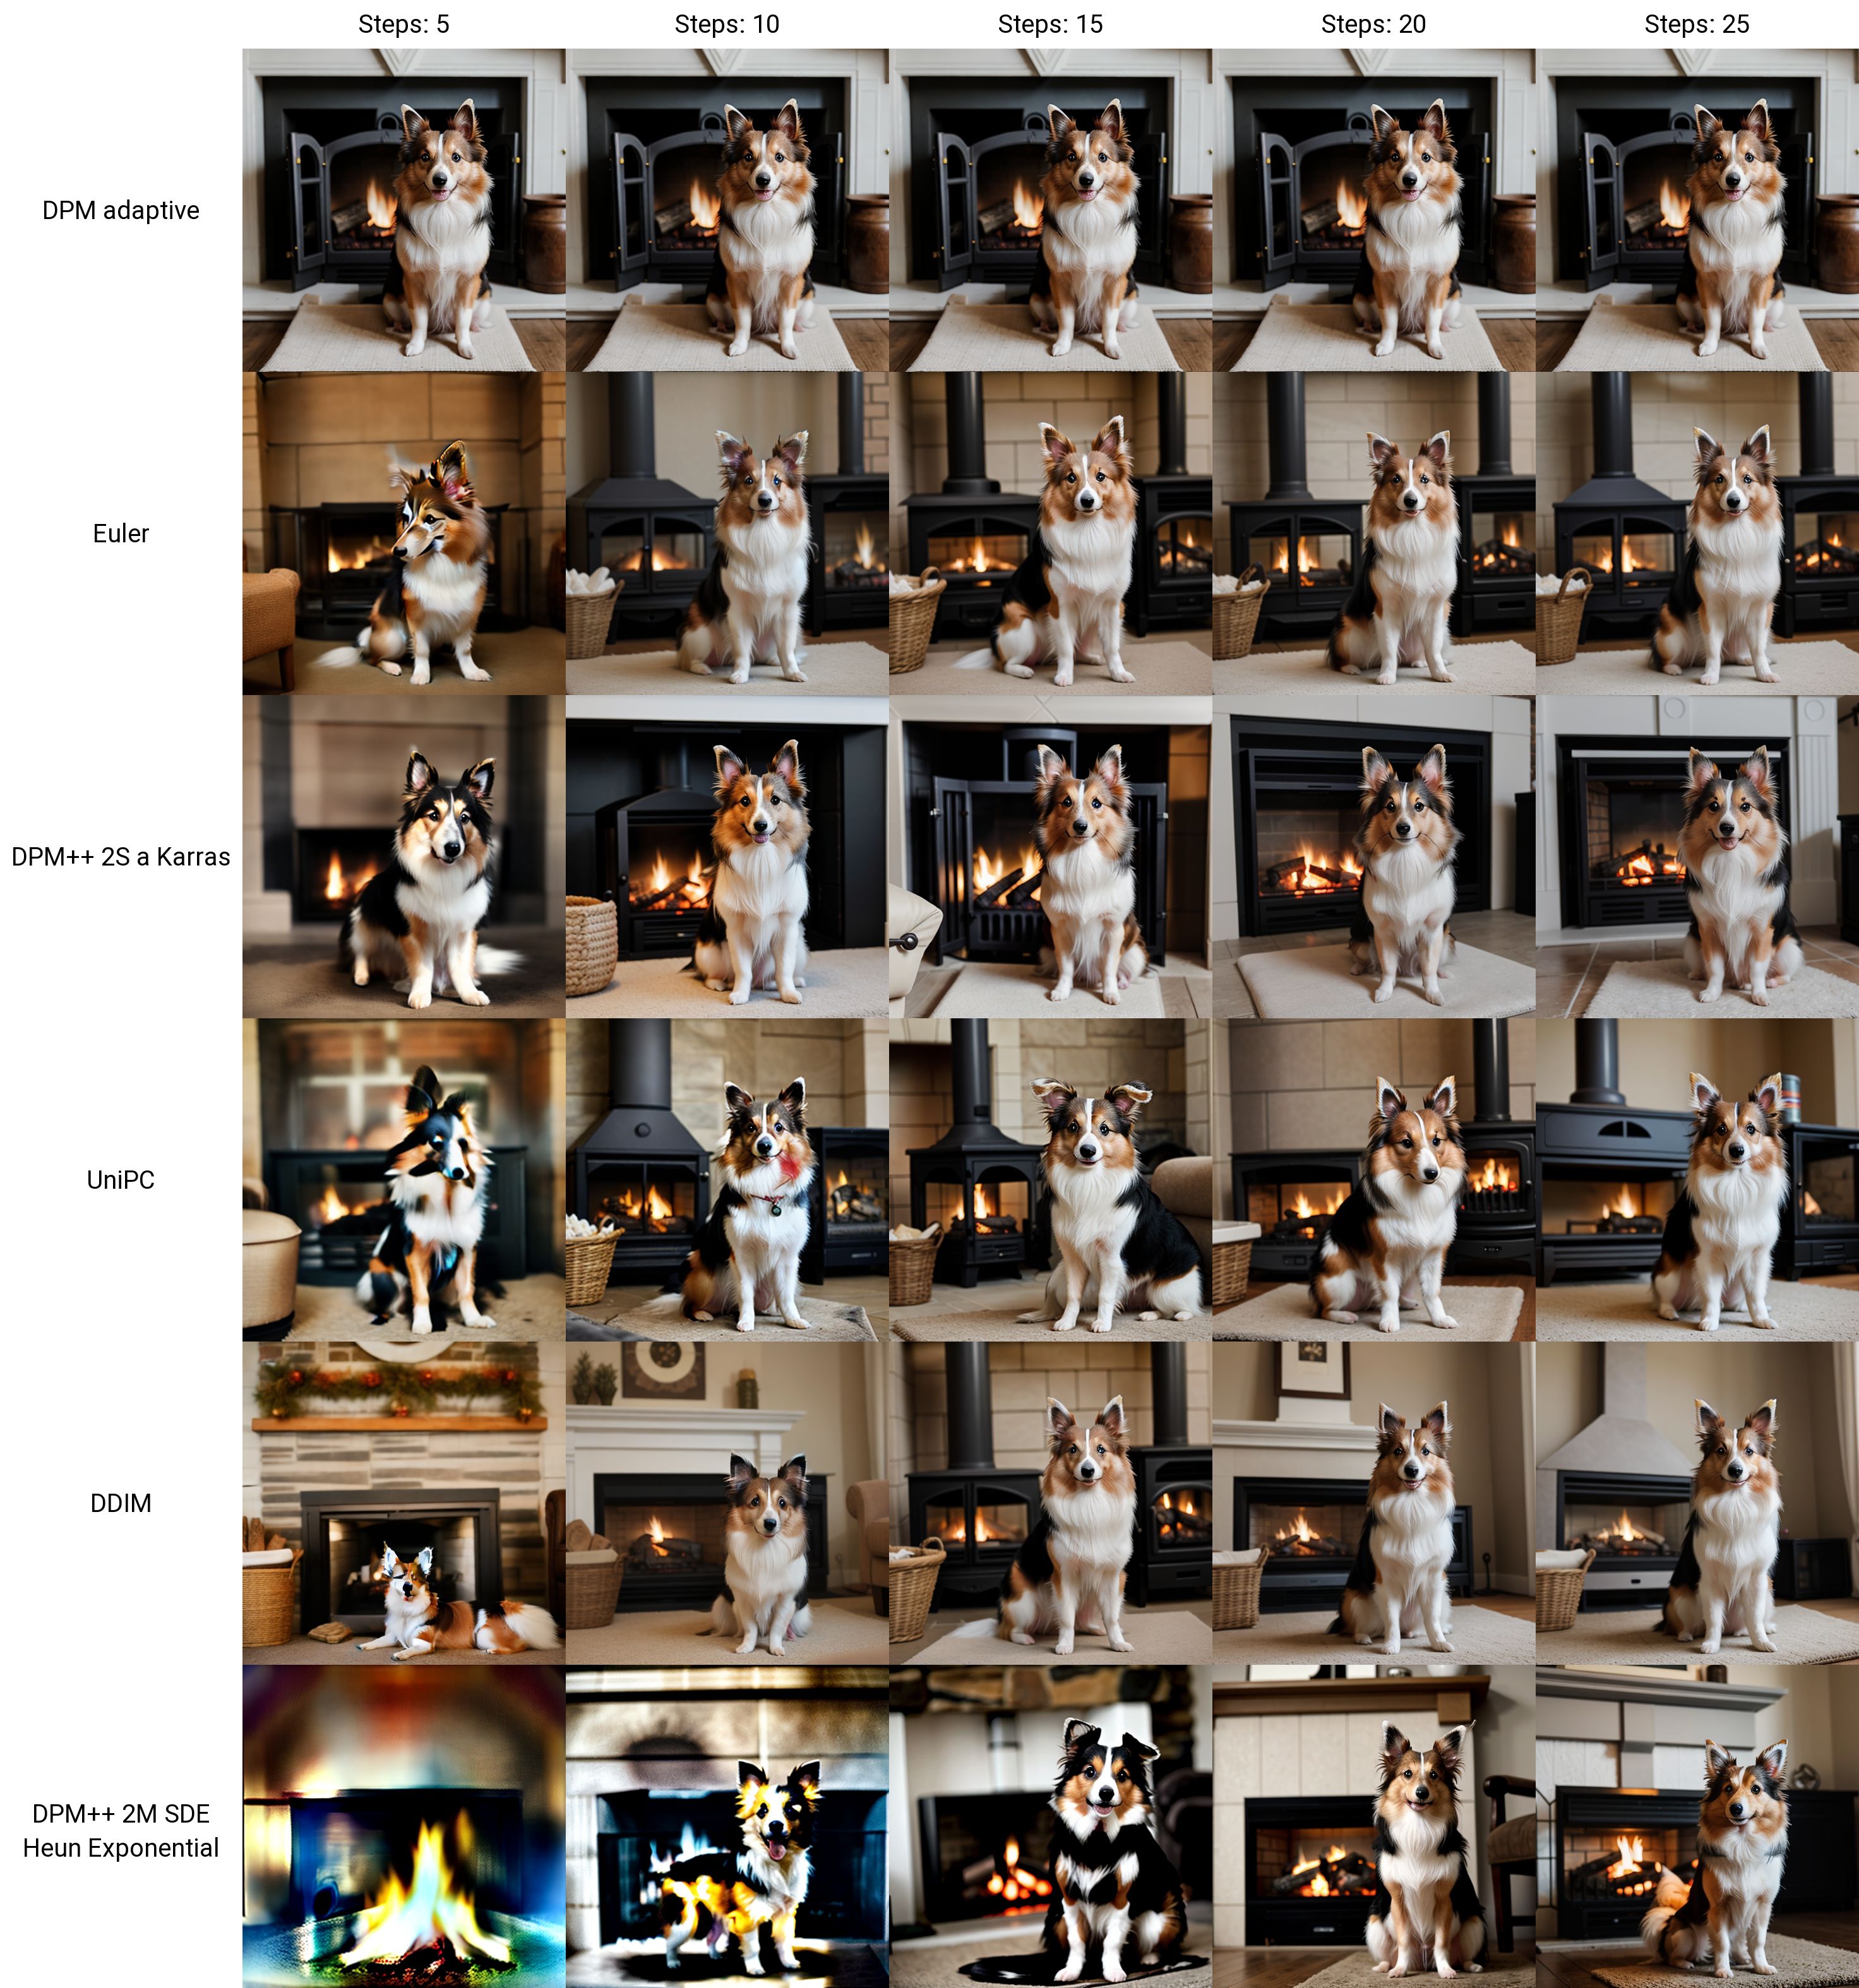
More information about sampling can be found here. It is recommended to experiment with different methods because come can produce better results, others can converge faster, meaning the process needs less steps and some can be used to generate more reproducbile results.
- Steps: The number of steps that will be used to generate the image. The more steps, the more time it will take to generate the image. As a rule of thumb, 20-30 steps is a good number to start with. Less than that and the image will be noisy, more than that and the image will be too overdone or oversharpened. You can also use the slider to change the number of steps. Different samplers will require different number of steps to produce good results.
An example of the relationship between the number of steps and the quality of the image can be seen below:
-
Width: The width of the image that will be generated. The default value is 512px because the training set dor the diffuison process was originally 512px by 512px. You can change this value using the slider, but we ware that the larger the image, the more time it will take to generate it.
-
Height: The height of the image that will be generated. You can change this value using the slider, but we ware that the larger the image, the more time it will take to generate it.
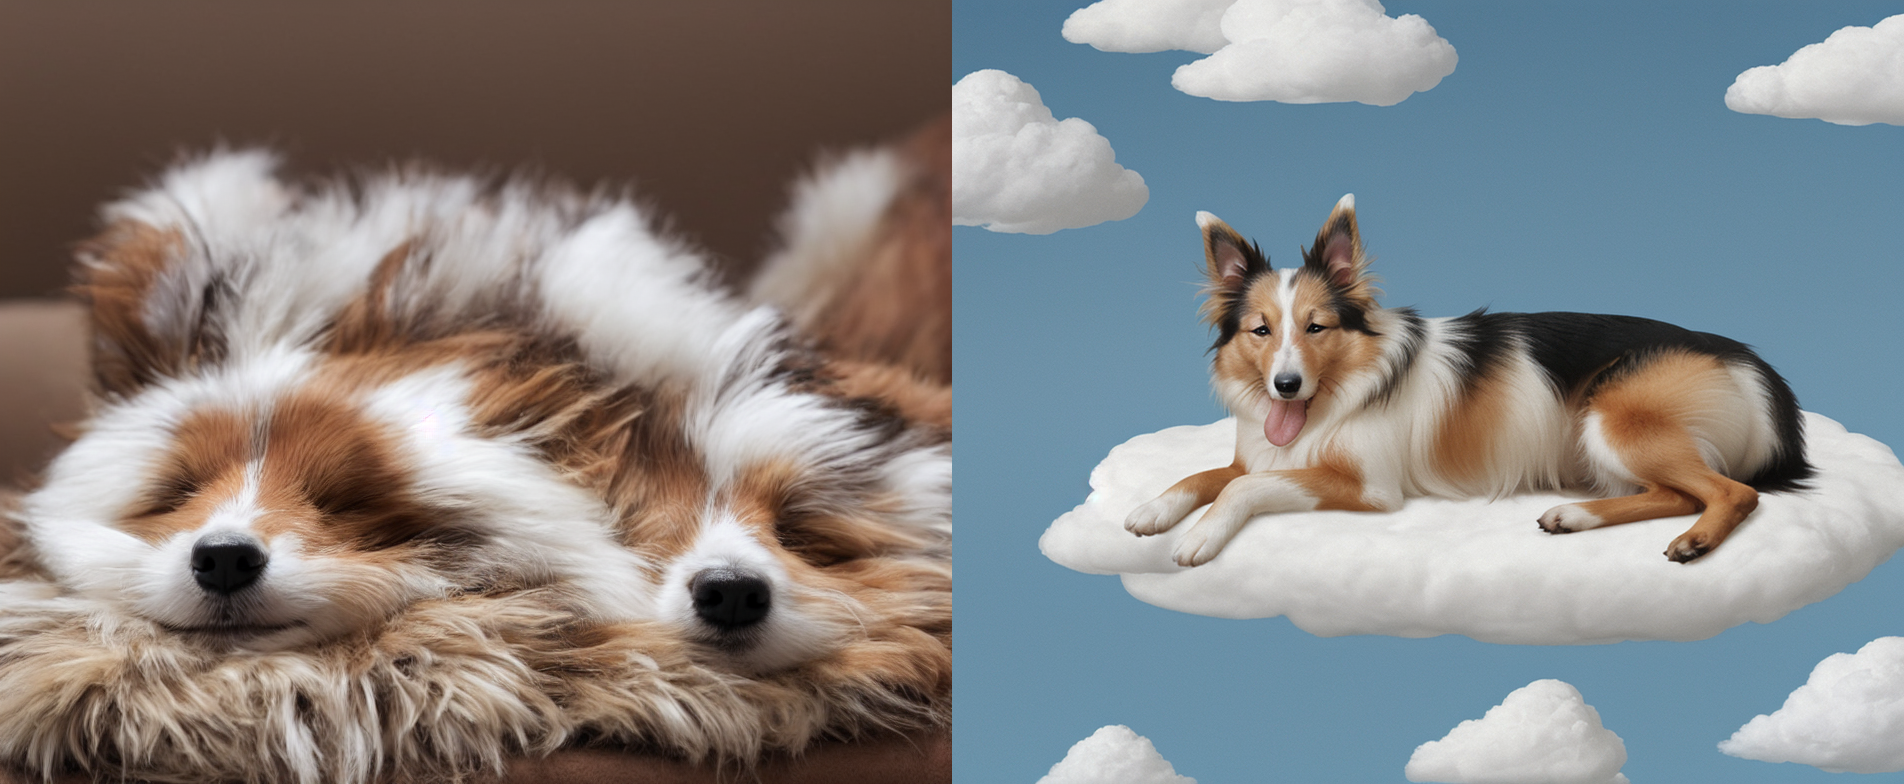
Because of the nature of the training (512x512), the diffusion process could start to lose coherence if the ratio of the images is not square, or if the dimmensions are too big. There are solutions to this such as the Hires.fix and upscalling (mentioned below). Recently, this lack of cohesion can be solved using different models and the new SDXL. Because the training of those models was done with different image sizes.
The image below showcases the cohesion problem. The prompt was a sheltie sleeping on a cloud with dimensions width:952, height:784. On the left we have a generation with the standard model, and on the right we have a generation with a newer model.
-
Batch Count: The number of times that this configuration of the diffusion process will be executed.
-
Batch Size: This is the number of images within one batch.
-
CFG: This value determines the fidelety of the generation according to the prompt. At lower values the resulting image will have “less” of the prompt on it, so it will be guided to some random space, or in others words it will comform less to the prompt. At higher values there willb e less artificat and the system will try to produce an image as close to the prompt as possible, however this can lead to overfitting, oversharpening and over hallucinations. A rule of thumb is to use something bewteen 7 and 12. You can also use the slider to change the value.
Below is an example of different CFG values and how that affects the iamge.

-
Seed: The seed that will be used to generate the image. This is a number that will be used to “lock” the latent space in order to produce consistent results. This is useful for animation, where the same seed can be used to generate a sequence of images. If you leave this field empty, the system will generate a random seed. You can press the recycle button to get the seed of the previous image.
-
Extra Variation: This is a parameter that can be used to add more variation to seed. It is useful if you are creating several images at the same time and want to have smaller variations in the generations. The value can be between 0 and 1. The higher the value, the more variation will be added.
-
Hires.fix: This dropdown menu can help produce higher resolution images while keeping the context of an image. Because of the diffusion process, images with different sizes will have a different initial noise, thus different results will be produced, even if the same seed and prompt are used. The Hires.fix will have 2 passes on the generation. The first one is a normal diffusion generation, then it will use a upscaler (which can be changed) and will generate an image to a size that you can choose. Depending on your hardware you will reach a limit in how big the images can be.
Below we can see a comparison between a normal generation and a upscaled one using the Hires.fix. We can notice that the context and composition reamin the same, but more details are added. Image on the right is 512x512 and on the left is 1280x1280.
Under Seed field we can find some Script tabs. Depending on the extension that we have installed the will appear here or in the main tabs on the top. This is a field where we use some scripts to modify the generation process. This is useful if we want to modify the prompt or the seed as we generate multiple images. We can also create XY plots to compare difrent values and how they relate to each other.
Img2Img #
This is a method that uses the diffusion process to generate new a image from an input image and text prompt i.e., image translation. The output image will follow the color and composition of the input image.
We can drag and drop any image into the img2img field, or we can send an image that we generated from the txt2img tab to the img2img tab by using the “send to img2img” button under the resulting image in the txt2img tab.
Then we change the prompt to what we want the resutling image to “have” or to be removed (using the negative prompts).
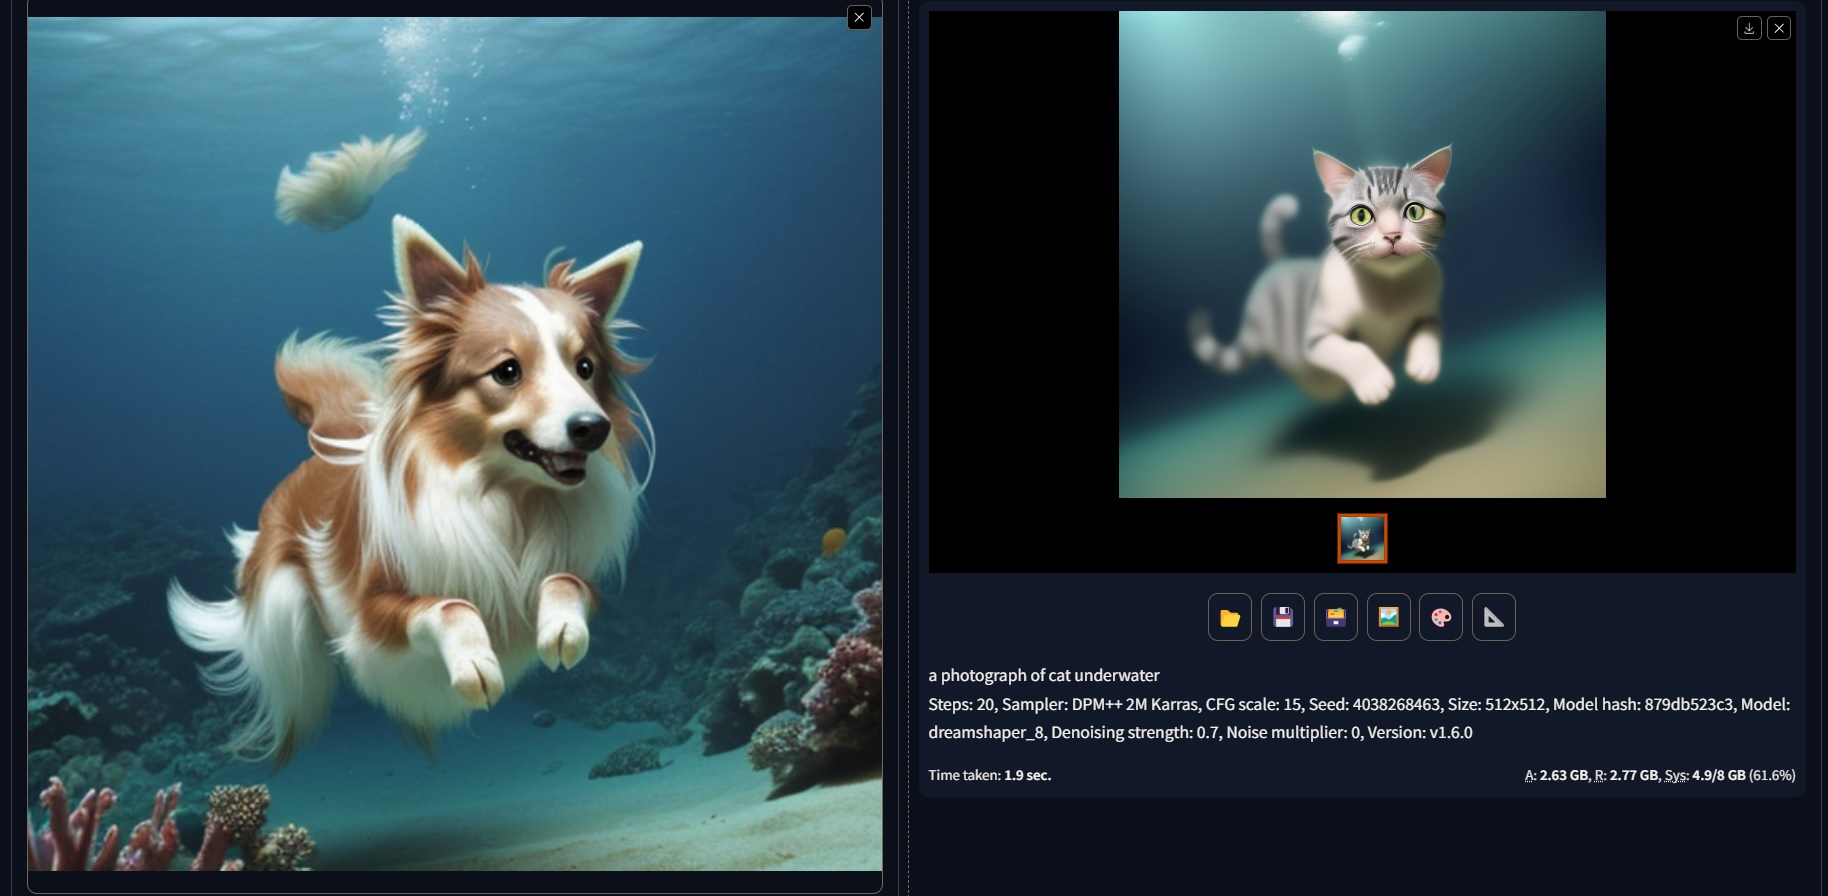
The example below shows how we can use the img2img tab to generate a new image from an input image and a prompt. The original prompt was a photograph of sheltie underwater, and we change the word dog -> cat.
Many of the parameters, fields, and configurations are the same as txt2img, thus they will not mentioned here again. The main difference is that we have an input image, and we can use the following fields:
-
Input Image: This is the image that will be used to generate the new image. You can drag and drop any image into this field.
-
Resize Mode: We can choose what to do with the resulting image. It could be crop and just diffuse some part of the input image or resize and then diffuse it.
-
Resize: In the img2img tab we can already do some resizing, but it is less powerfull and we dont have as much control as the Hires.fix method.
-
Denoising: This is a parameter that can be used to add more or less fidelity to the resulting image i.e., how much of the input image will affect the resulting image. At value 0. We will get the input image. At value 1 we will get a complete different image. As a rule of thumb, values around 0.7 are good to start with.
There are specific models for the img2img process. All models can be used but there are some that produce better results.
We can also use the Sketch Tab, where we can draw on top of an input image using a simple brush and the diffuse the image to generate e.g., some realistic or artistic version of our drawing.
You can find more information about the img2img process here:
The last tab in the terciary group of tabs is the Batch Tab. Here we can upload a directory containing images and then generate new images from them. We can also use the same prompt for all the images, or we can use a different prompt for each image. We can also use the same seed for all the images, or we can use a different seed for each image. To achieve this we can use the script tab.
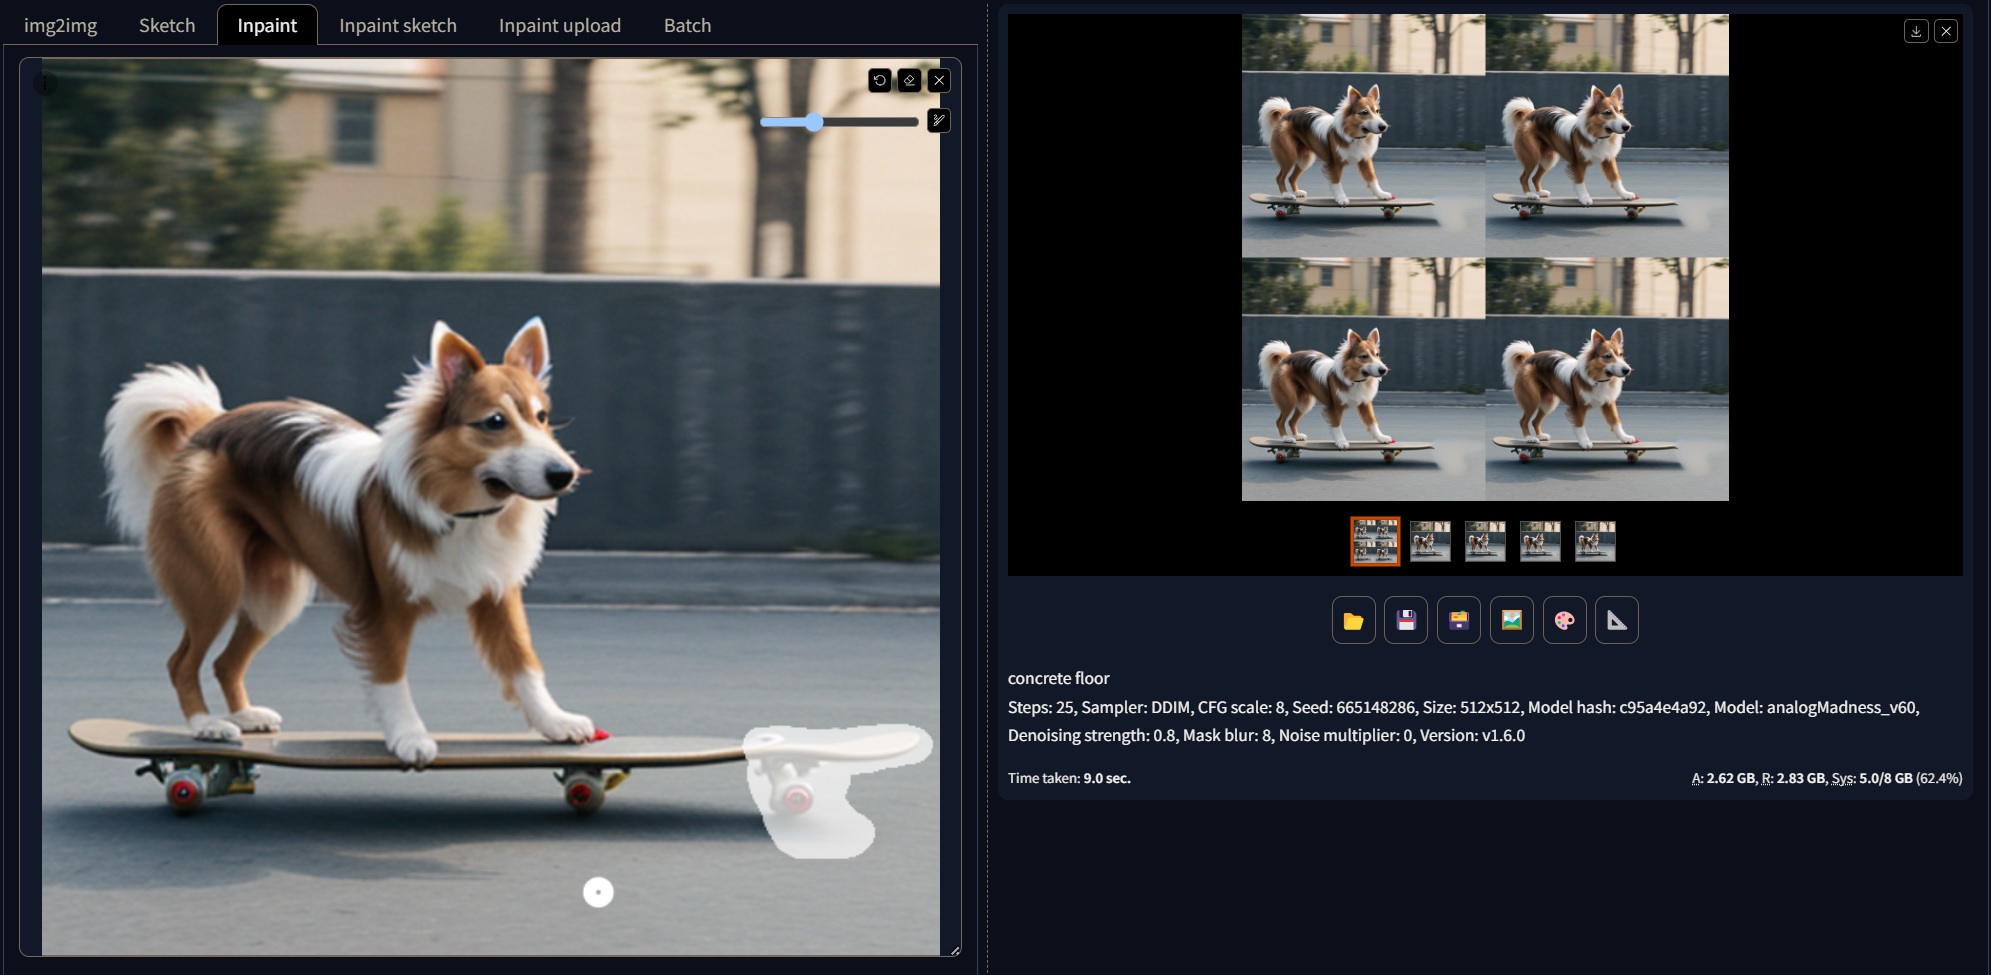
Inpainting #
Similar to the img2img process, the inpainting method translates a part of an image into another image. This method is useful in the cases where our images have defects or we want to replace parts of itIn this case we use a brush to mask the area that we want to be replaced. Likewise we can send our images from the txt2img tab or even from the img2img to the inpainting tab by using the “send to inpainting” button under the resulting image.
Many of the parameters, fields, and configurations are the same as img2img, thus they will not mentioned here again. The main difference is that we have a mask and the choice to fill the mask space with different things.
We paint into the image using the brush tool. to change the size or delete our strokes, we can use the buttons on the top right corner of the input image field. To remove the image we can click the “x” near the aforementioned buttons, and simply drag and drop another one.
The main parameters for inpainting are:
-
Mask blur: This controls how much the mask edges will be blur before the inpainting process.
-
Mask mode: We can choose if we mask what is inside the mask or outside the mask.
-
Mask content: If we pick fill, the area will be filled with the colours of the image; if we pick original, a new diffusion porcess will be performed; if we pick latent noise, the area will be filled with the noise of the image; if we pick latent nothing the area will be filled with zeros(black).
-
Inpaint area: here we can choose if the mask will be filled with the “awareness” of the whole image or just what is within the masked area.
An example of the inpainting process can be seen below.
You can find more information about inpainting process here:
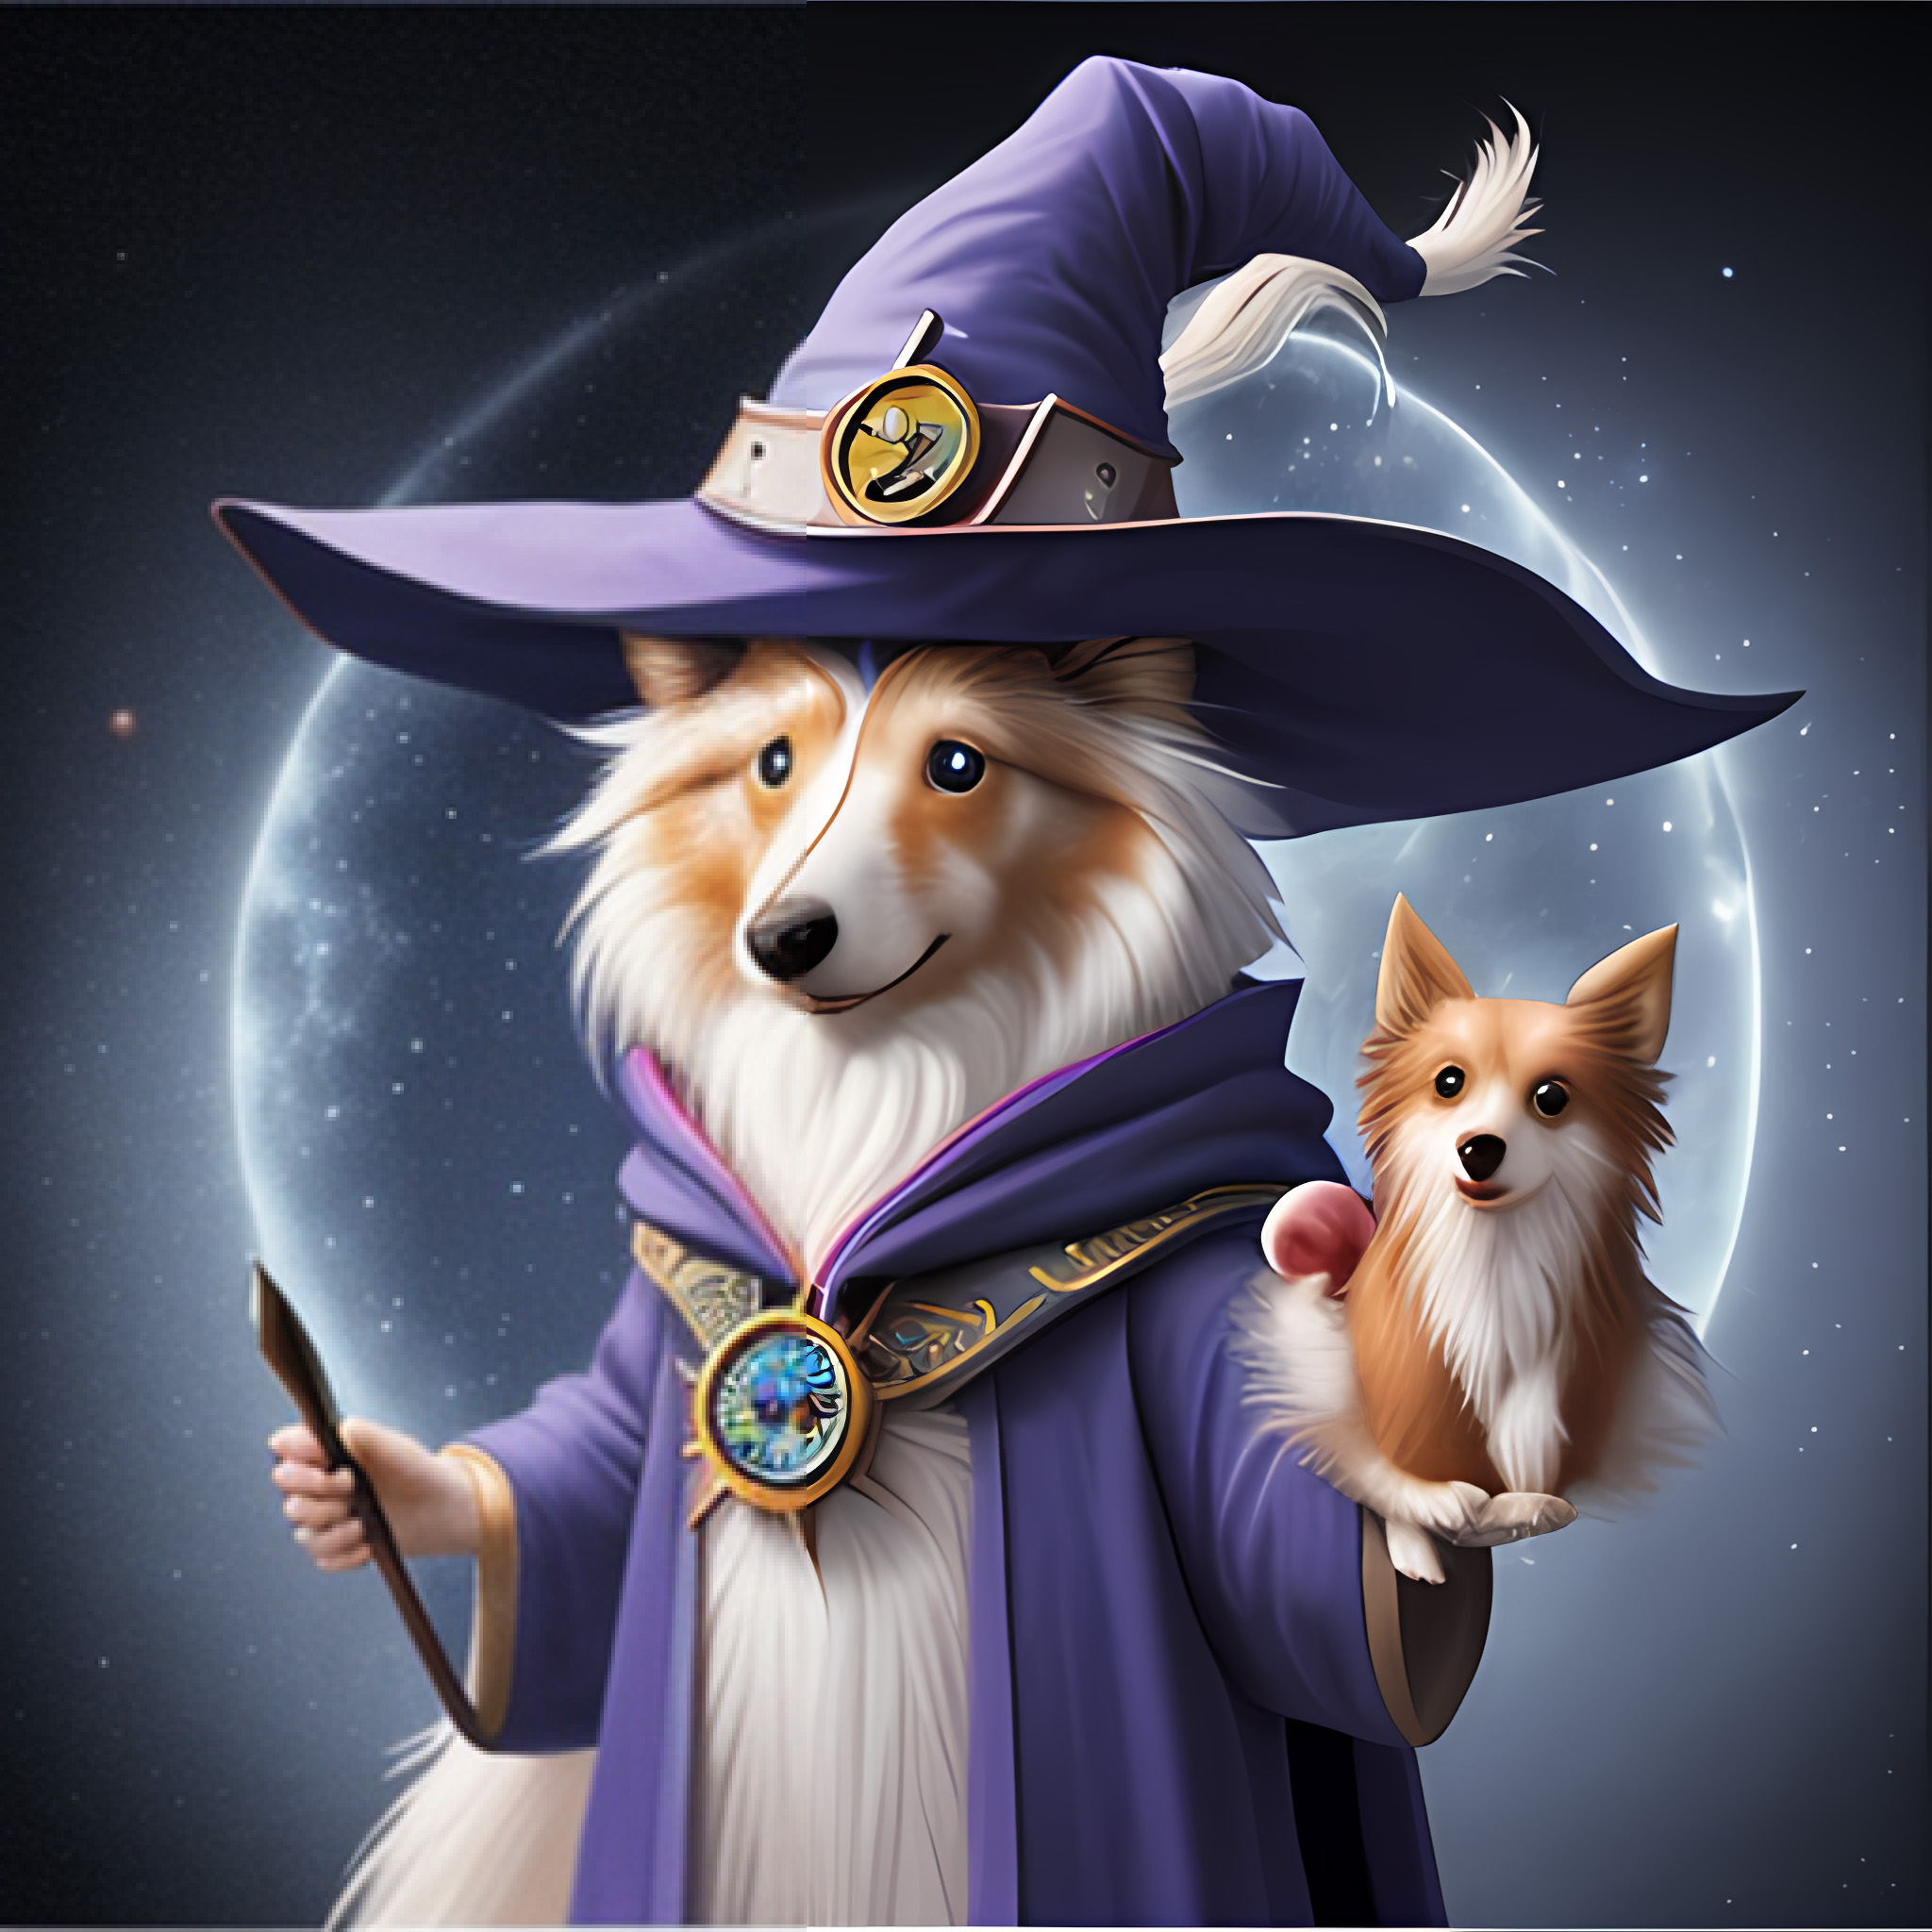
Upscaling #
Upscaling is the process of increasing the resolution of an image. In Stable Diffusion, upscalers are used to enhance the quality of images produced by the model. The Extras tab in Automatic 1111 is a feature that allows users to install additional models and tools to use with Stable Diffusion. Different upscalers can produce different results, e.g., the R-ESRGAN 4x is good for general use but sometimes is not as good with faces. It is recommended to experiment with different upscalers to find the one that best suits your needs.
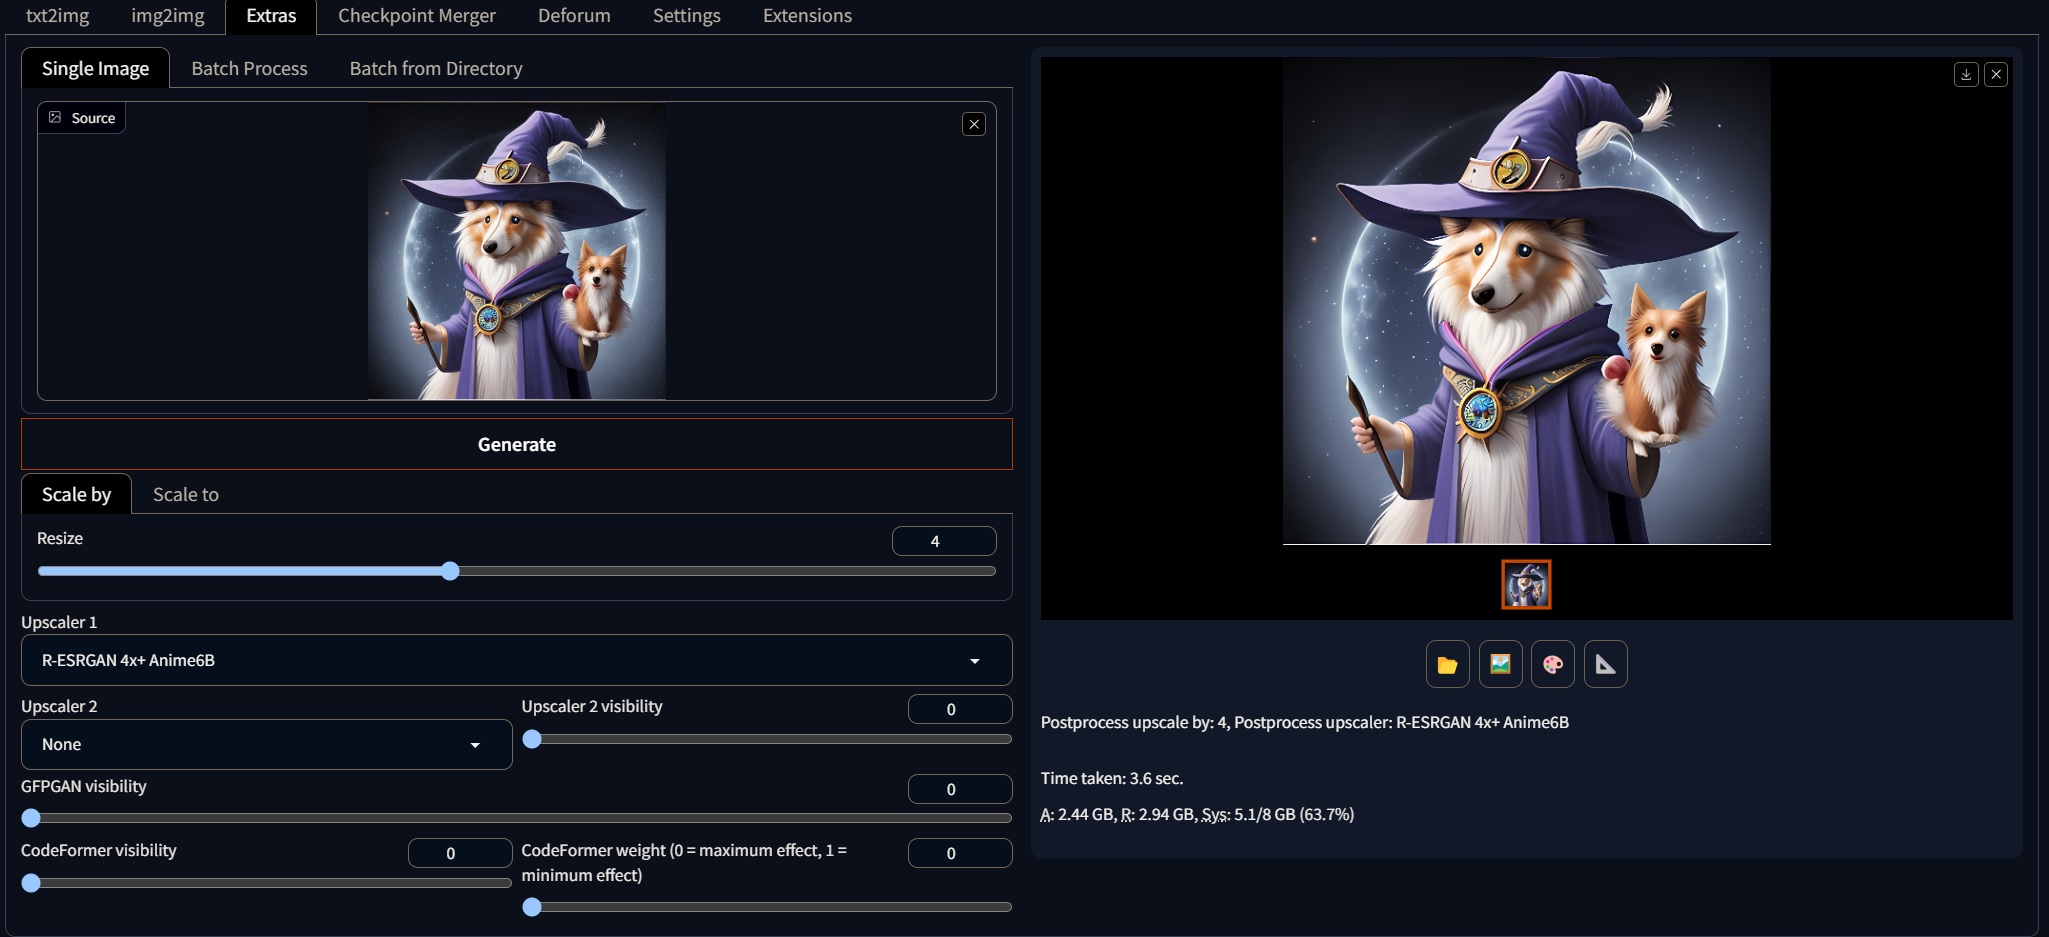
There are some extra field and sliders in this tab:
-
Drop Area: You can drop your image here, or similar as txt2img and img2img, you can send your image to this tab by using the “send to upscaling” button under the resulting image.
-
Resize: The amount to be resized. Depending on your hardware you can do larger sizes. However the process could be slower becase the upscalers work by tiling the input image and upscalling different parts of it, then merging it all together.
-
Upscaler: The upscaler that will be used to enhance the image.
-
GFPGAN Visibility: GFPGAN is a popular upscaler for faces, so it can compensate for the lack of detail that some upscalers can generate. This slider controls how much of the GFPGAN upscaler will be used. The higher the value, the more GFPGAN will be used.
-
Codeformer: This is a newer and perhaps more accurate restorer for faces. It can be used in combination with GFPGAN to produce better results. This slider controls how much of the Codeformer upscaler will be used. The higher the value, the more Codeformer will be used.
As a rule of thumb, you should use a combination of all these upscalers/restorers but it depends on your input image. To do extra large images, you can upscale in small amounts (2) and then re upload the image to the drop area
The upscalers included with Automatic 1111 are good for most cases but you can find more here:
Models #
There are different types of models that Stable Diffusion can use. Some are the core checkpoints that were released by Stability AI, and others are checkpoints that were trained by the community. The core checkpoints contain the information in the latent space that we use to generate images, therfore they can be trained to focus on specific styles. Some can be really good at generating cars, and others can focus on natura or people.
SD 1.5 & SDXL Checkpoints #
SD 1.5 has been the most popular version of all the current models. It is easy to train and to combine with other models, and consumes less RAM than SD 2.x ( which is not reccomened for most users).
SDXL on the other hand is a new model that was trained with a different dataset and has a different latent space. This model is more powerful and can produce better results, but it is also more demanding in terms of hardware. This model was training on larger images, thus it can produce higher resolutoin images without the need for an upscaler. This model can still run on GPUs with at least 8GB of VRAM, but it is a bit trickier to train.
Furthermore, this model required a “refiner” which is a model that enhances the image details produced by the SDXL Base. It is designed for the enhancement of low-noise stage images, resulting in high-frequency, superior-quality visuals. Additionally, SDXL works better (for now) in other Stable Diffusion solutions such as Comfy UI.
To install checkpoints/core models, you can move the your_model.ckpt /. safetensors to the folder:
stable-diffusion-webui\models\Stable-diffusion
You can find the base models here:
And community models(checkpoints, Loras, embeddings) here:
Lora #
Low-Rank Adaptation of Large Language Models (LoRA) is a training method that accelerates the training of large models while consuming less memory. These are models that are added on top of the core checkpoints. That means that the information on the checkpoint is not modified. These models are trained to focus on specific styles, and can be combined with other models to produce better results. Loras are really popular because they are quite lightweigth and can be trained easily to focus on a specific concept and can be control with an embedded parameter or weight.
To install Loras you can move the your_lora.pth /. safetensors to the folder:
stable-diffusion-webui\models\lora
Then you can refresh the models in the main interface by clicking the reload button. You can also use the Lora tab to browse the models in your machine. Some Loras can work better or worse with some models e.g., if a core model has a lot of cars, then a Lora that focuses on cars will work better with that model.
You can find more information about Loras and Lora models here:
Others #
There are other model types that can also be used within Automatic 1111. However they have recently become less popular in part due to the flexibity and lightweightness of Loras. These are:
-
VAE: Variational Autoencoder. This is a model that can be used to generate images from a latent space. It is a bit more complex to train and use, but it can produce good results. It is also a bit more demanding in terms of hardware. It is a crucial component of the neural network model used in Stable Diffusion v 1.4 and 1.5. The VAE encodes and decodes images to and from a smaller latent space to the RGB space, allowing for faster computation and better color representation. You can get the base VAE here. However never models have the VAE baked in, so it is not needed to install a separate VAE model.
-
Embeddings: Embedding is the result of textual inversion, a method to define new keywords in a model without modifying it. The method has gained attention because its capable of injecting new styles or objects to a model with as few as 3 -5 sample images. Textual inversion finds the embedding vector of the new keyword that best represents the new style or object, without changing any part of the model. In other words it uses existing words witiohn the model to describe a new concept. You can find more information here.
-
Hypernetworks: These are a small neural network attached to a Stable Diffusion model to modify its style. These networks in fact modify the core models to inject new concepts. They are even smaller than Loras and easy to train but they are not as flexible because of the nature of the injection. You can find more information here.
Training #
We can add extra network or using extra models to the checkpoints. But if we need to have a checkpoint that specializes in a specific concept, we need to train it. Luckyly Google realeased a technique called Dreambooth that can inject custom concepts into a model as a whole, not just parts of it like hypernetworks.
It it possible to train using Automatic 1111, but depending on your machine the training process could be slow. Thus you can use a Colab instance or other services listed below:
Checkpoint Merging #
We can merge different checkpoints to produce a new one. This is useful if we want to combine different styles or concepts into a single checkpoint. This can be done using the Checkpoint Merging tab. We can select the checkpoints that we want to merge, and then we can select the weights that we want to use for each checkpoint. The higher the weight, the more influence that checkpoint will have on the resulting checkpoint. You have to bare in mind that by merging some information is lost, thus the models could be less accurate for certain concepts.

The merging process does not take too long and can be performed in any machine because the process is about merging the ckpt matrices.
It is reccomended to save merged models and downloaded models as.safetensors. This type of checkpoints have the same size as a normal.ckpt/.pthbut they are just numbers, thus they cannot be used to distribute malware or other information within them.
Extensions #
The functionality of Automatic 1111 can be greatly extended by installing extensions. These are additional python scripts and features that can be added to the interface. There are many extensions that can be used for different purposes. Some are used to generate prompts, others are used to generate animations, and others are used to generate images from audio. You can find more information about extensions here:
To install extensions you can either load them within the Extensions tab by click Load from, which fetches extensions from the Automatic 1111 repository, or by installing from an URL (usually a github repo)

Some notable extensions are:
ControlNet #
By far the most popular extension for Automatic 1111 is ControlNet.
This is a neural network structure that enhances the control over diffusion models by adding additional constraints. It allows you to generate better and more controlled outputs. The neural network blocks are copied into a “locked” copy and a “trainable” copy. The “trainable” one learns your condition, while the “locked” one preserves your model. This allows to embed your condition into the model, and generate images that are conditioned on your input., in other words it will follow your image closer than img2img or other tehcniques because is feeding the system with a guide rather thatn concepts.
More information about the system here:
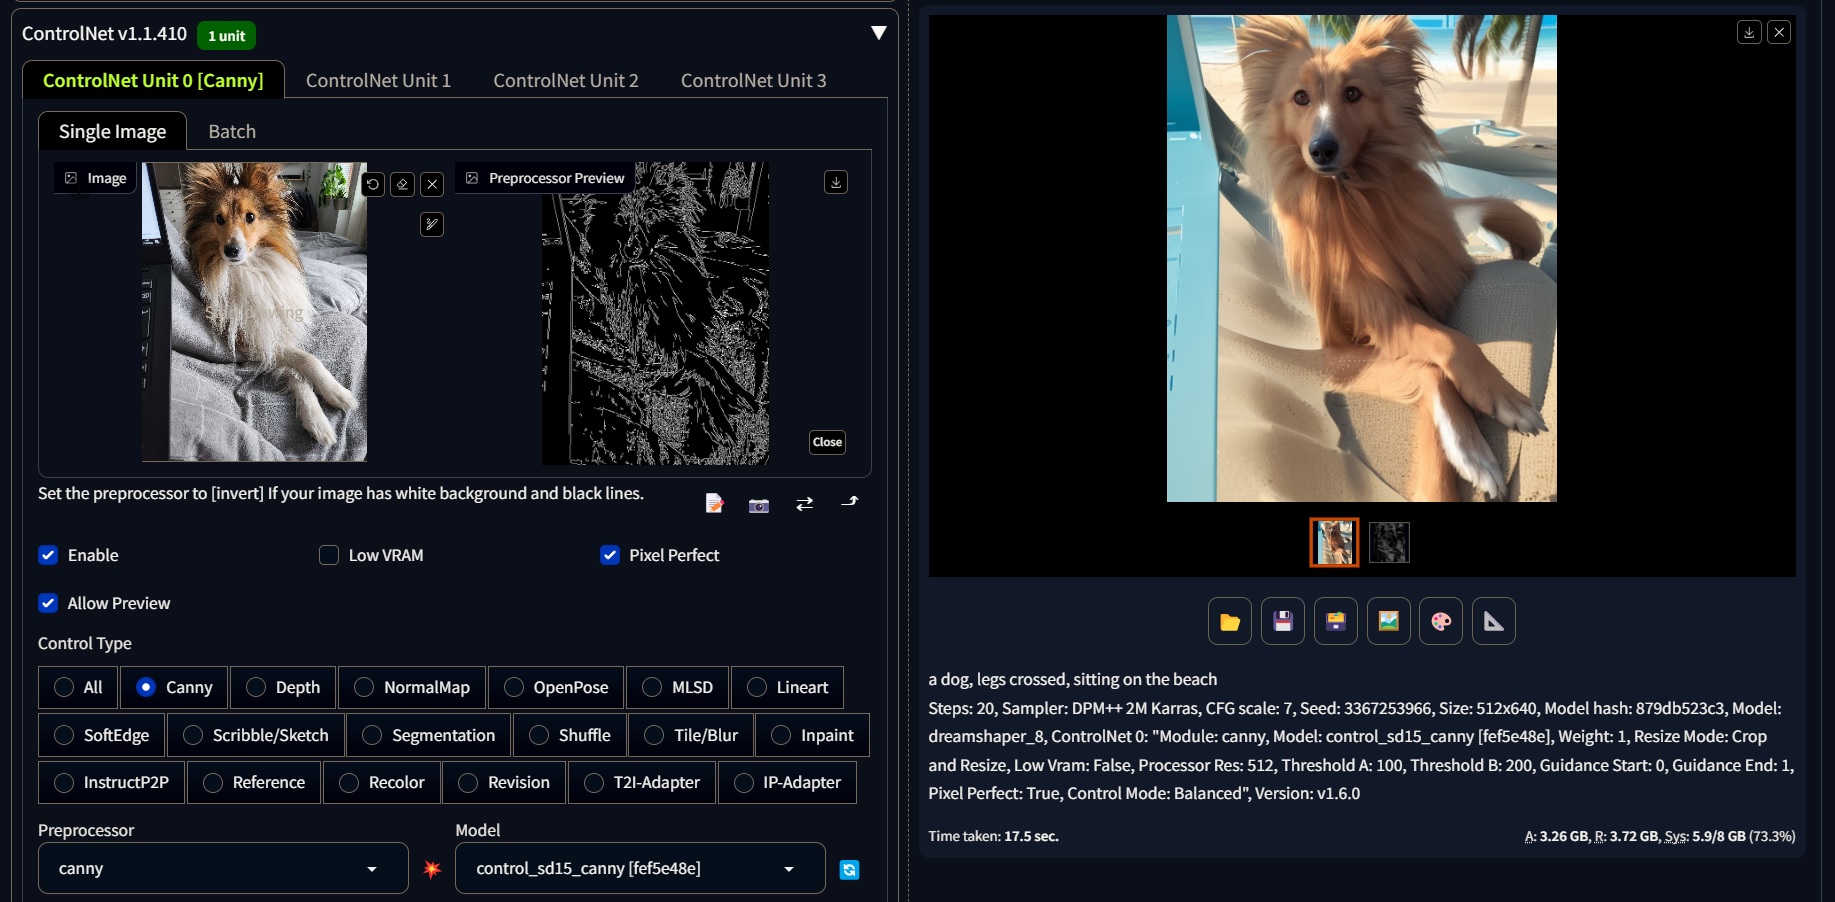
The main interface of the ControlNet Tab is similar to the img2img tab in the sense that you can also drag and drop an input image, but there are some key fields that are different.

-
Enable Row: This is a field that allows you to enable or disable the ControlNet. You can also check the buttons if you want a pixelperfect matching of the image, and if you want to see a preview of the network.
-
Control Type: This is a field that allows you to choose the type of control that you want to use. It could vary from canny, depth, qr, temporalNet, etc. Different control types will produce different results.
-
Preprocessor: This is helpful to turn on the preview so that you know what the preprocessor is doing. Once the preprocessing is done, the original image is discarded, and only the preprocessed image will be used for ControlNet.
-
Weight: We can choose how much the ControlNet affects the diffusion process. The higher the weight, the stronger the effect of the input image.
-
Steps: This determined when the ControlNet will be applied. We have lower and higher bounds, e.g., if we have 20 steps, we can apply the ControlNet from step 5 to step 15, which translates to 0.25 to 0.75. This is useful if we want to have a more controlled or free diffusion process.
-
Control Mode: We can swtich between what is more imporant, the input image or the prompt.
-
Resize Mode: This will adjust our image according to the
widthandheightfields. We can choose to crop the image or to resize it.
Below you can find an example of a canny model in action.
ControlNet can also be used within the img2img Tab to further guide the diffusion process.
We could also use a model called TemporalNet within the Batch img2img, which is rather usefull for animations. This model will try to keep coherence between the images and will reduce the flickering resulting from the diffusion process. You can find more information about TemporalNet below:
Animation #
Deforum #
Deforum is an open-source software for making animations using Stable Diffusion’s image-to-image function. It applies small transformations to an image frame and uses the image-to-image function to create the next frame. Deforum interpolates betwen the rfams by generating a new noise vector for each frame. We can schedule the transformations, interpolation, noise CFG scale and seeds to create different types of animations. Often the results are “trippy” or “psychedelic” because of the nature of the interpolation.
There are lots of parameters and configurations that can be used to generate different types of animations. Therefore this guide will only cover the basics of the extension. You can find more information about Deforum here:

We can focus on the second page of the deforum tab (keyframes). The most important fields are:
-
Animation Mode: It can be 2D (flat animation);3d which is useful if we have some motion in 3D space; video input, which draives the animation, and interpolation that is helpful to modify existing animations.
-
Motion Tab: Her we can discribe how our virtual camera will move troughout the scene. The movements are described with mathematical functions and steps.
You can find more information about how to do specific motions for your animations here:
The second most important tab is the prompts tab. Here we can input our keyframes and the descrition of what happens at each keyframe.
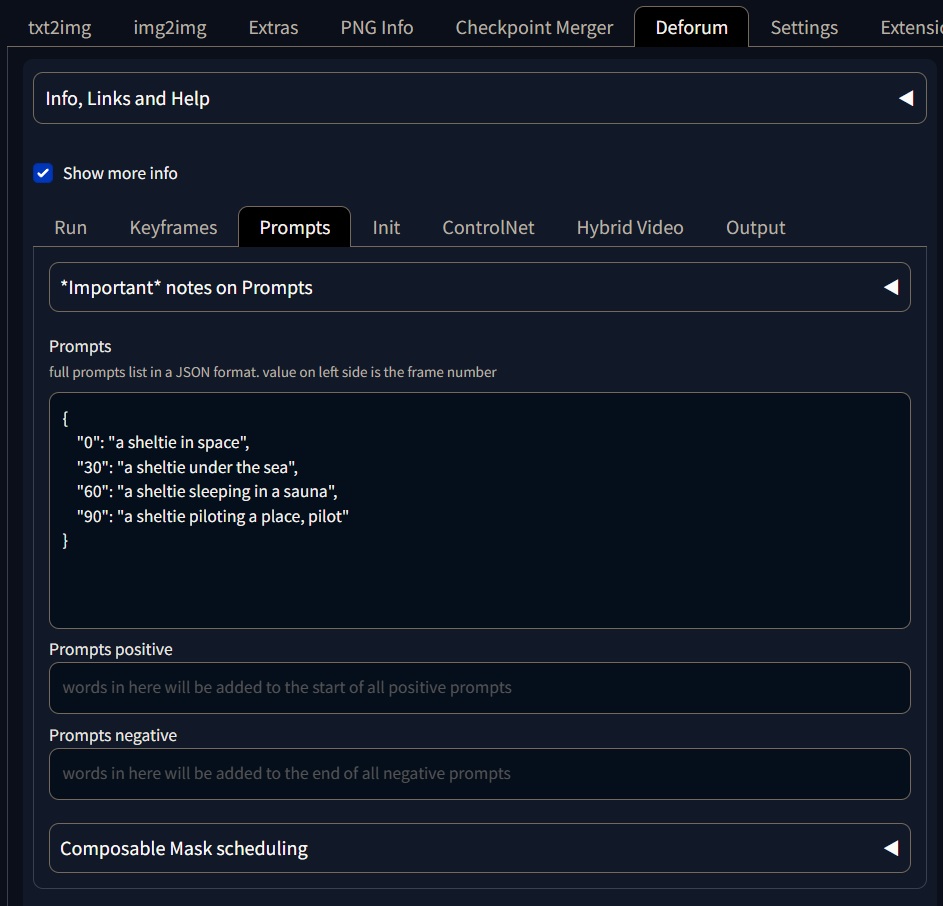
You should follow a specific convetion when inputing the keyframes. The keyframe should be types as "0":"your prompt here",. The first set of quotes defien the keyframe, the second the prompt and finally a comma. Most of the errors in deforum are because of this.
Below you can find an example using the keyframes from the previous image.
Batch Animation #
Within the img2img Batch tab we can use ControlNet as well. If we add on top of that the TemporalNet model, we could have animations that are more coherent thatn Deforum and glitch less. To do this we just have to enable the ControlNet modules in the Batch img2img and provide and input and output folder. Then, we leave the ControlNet drop area empty because ControlNet will get the iamges from the input folder automatically.
AnimateDiff #
AnimateDiff is a technique for adding limited motion to Stable Diffusion generations. It uses a control module to influence a Stable Diffusion model, which is trained with a variety of short video clips. The control module conditions the image generation process to produce a series of images that look like the video clips it learns. The main different with other appraoches is that it contains motion modules that dictate the movement of the camera and the objects in the scene, and that the coehrnce is better than other methods because these modules are injected at each diffused frame.
The most important fields are:
-
Enable: This is a field that allows you to enable or disable the AnimateDiff.
-
Close Loop: This allow us to have looping animations by setting the first frame the same as the last frame. Then the diffusion-motion prosess will interpolate between the first and last frame.
-
Number of frames: if it left in “0”, then only the FPS will count once. Otherwise we can specify how many frames we want to generate.
-
FPS: The number of frames per second that will be generated.
-
Context Batch Size: This is the number of frames that exist in the memory at a time. A good value is between 16-32. Higher values could use more resources and produce more static animations.
-
Save: This allow us to choose how to save our animation, but is reccomended to use mark all the options.
-
Reverse: This allow us reverse the motino of the animation.
-
Interpolation: This allow us to generate a smooth animation by interpolating between the frames using the Deforum FILM method.
-
Drop Area: We can drive the animation (similar to Deforum’s video input) with our own videos or gifs
Below you can find an example of an animation using AnimateDiff. It is worth noticed that the motion is more coherent than Deforum, and the animation is smoother. The flickering is almost gone and the looping is better.
You can find more information about AnimateDiff here:
API #
Setup #
We can modify the certain low level parameters of Automatic 1111 using flags. These are parameters that we can set before launching the program. To set some flags we have to edit our webui-user.bat. Then we can add the following lines:
-- api --autolaunch
You can find more information about flags below among other ways to optimize the interface and make the diffusion process faster.
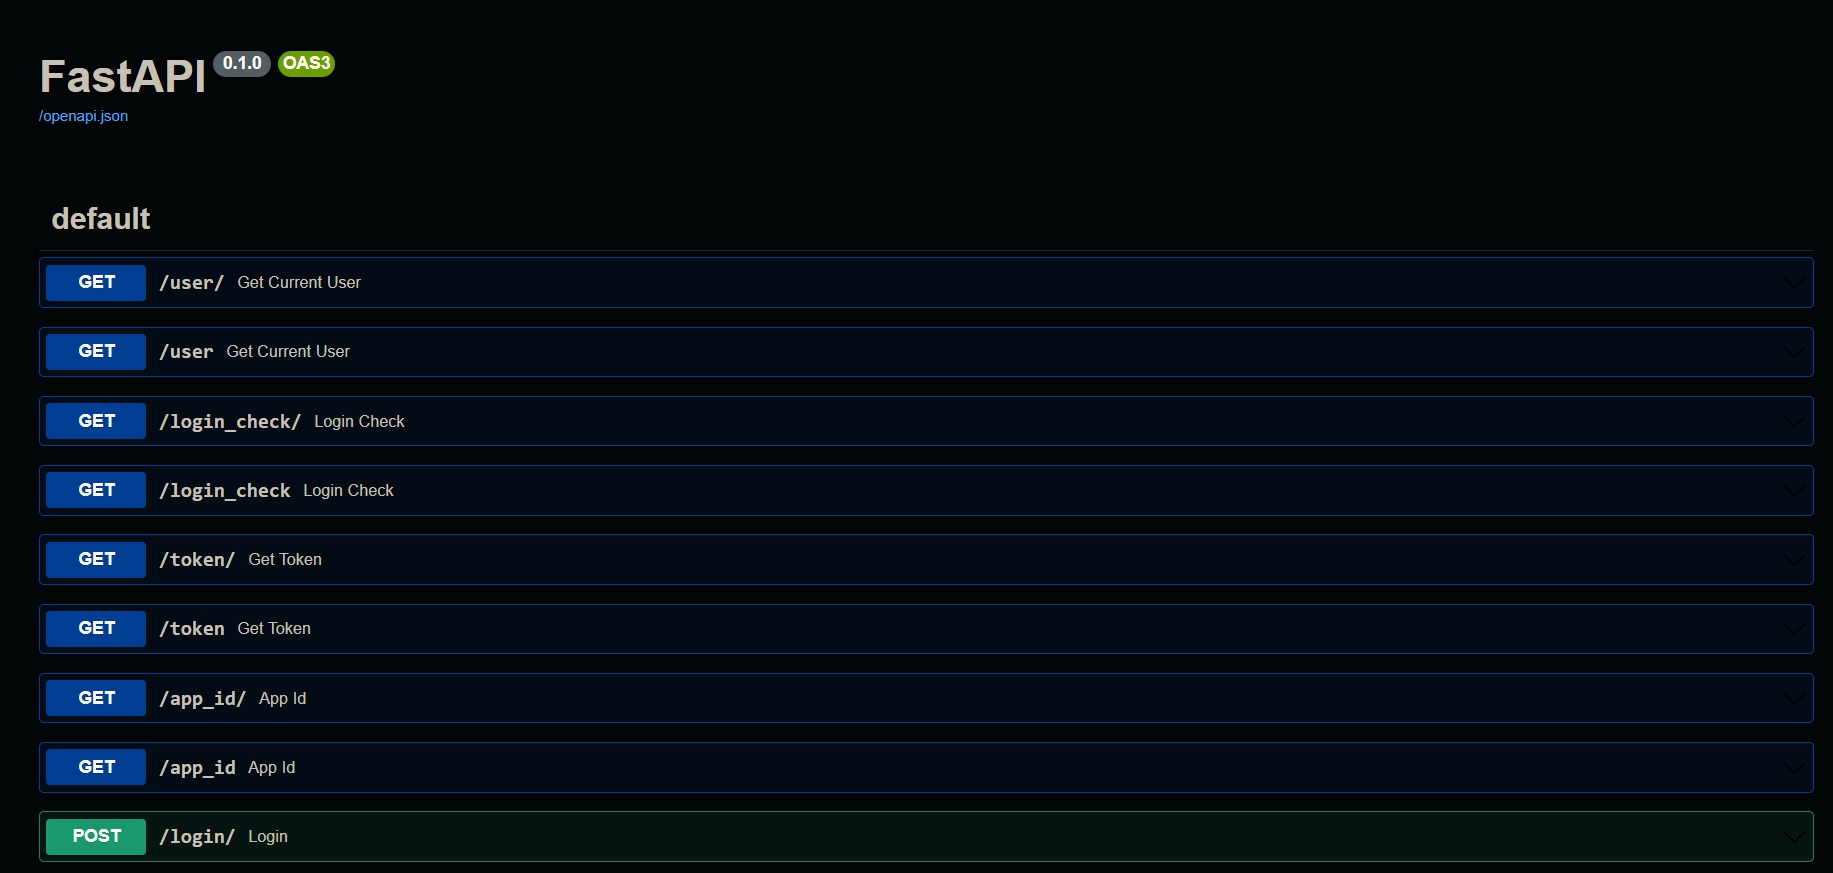
The --api flag allow us to control the interface using an API. The --autolaunch flag will launch the interface automatically. You can also use the --port flag to change the port that the interface will use. To access the API we go to the brower and type:
http://127.0.0.1:7860/docs
Be sure that you are using the same port as the normal web UI
This is how the API should look:
Touchdesigner #
This part of the guide is only for the workshop week and will be expanded to use other .tox file later
Please accees my courses and download the SD_API_AV_Workshop.tox file.