THU | Loops
- September 18, 2025
- 9:15–12:00
- Room 2420 (Marsio)
Inspiration #
- Yehwan Song also check out her Instagram
Mapping values #
Our main topic today is loops but let’s take a quick look at two very useful functions in p5.js that will help us create interesting interactions.
map() #
Another very useful function that we are going to need all the time is the
map() function. It allows you to convert values from one range to another. For example, if you would like to have the mouseX control a color value and you would want to use the full width of your canvas to have an effect on the value.
If you want to know what happens behind-the-scenes with map(), you can go look at the p5.js source code.
constrain() #
Usually, it is not enough to just map the values, you might also need to constrain them. Let’s use the previous example and modify the values a little bit.
Note that the map() now uses the mouse input only from 100 to 200 pixels and converts that range to 0 to 255. However, map() does not clamp or constrain the values to the desired output (0-255). The brightness is able to become negative or go over 255. You can use
constrain() to clamp the values to whatever range you want to.
brightness = map(mouseX,100,200,0,255);
brightness = constrain(brightness,0,255);
p5.js doesn’t generally completely break down if you use values outside the expected range but sometimes you need this extra level of control. If you continue to Physical Computing where we use Arduino, using constrain will become very important.
Loops #
We are going to learn about two different ways to create loops AKA repeat something AKA iterate. Those two options are while and for. A simple rule of thumb for choosing which one to use
- while: when you want to repeat something, but you don’t know exactly how many times
- for: when you want to repeat something, and you know the amount of times that you want to do it
But there are other things to also know about while and for. Let’s try to go through them.
There are two other loops available in JavaScript that are really useful:
We might need or want to use them later in the course, but let’s try to understand the basic while and for loops first.
While #
The while loop structure resembles the if statement, with one key difference: an if statement is only executed once and the while loop is going to repeat itself as long as the expression is true.
while (condition) {
  // code block to be executed
}
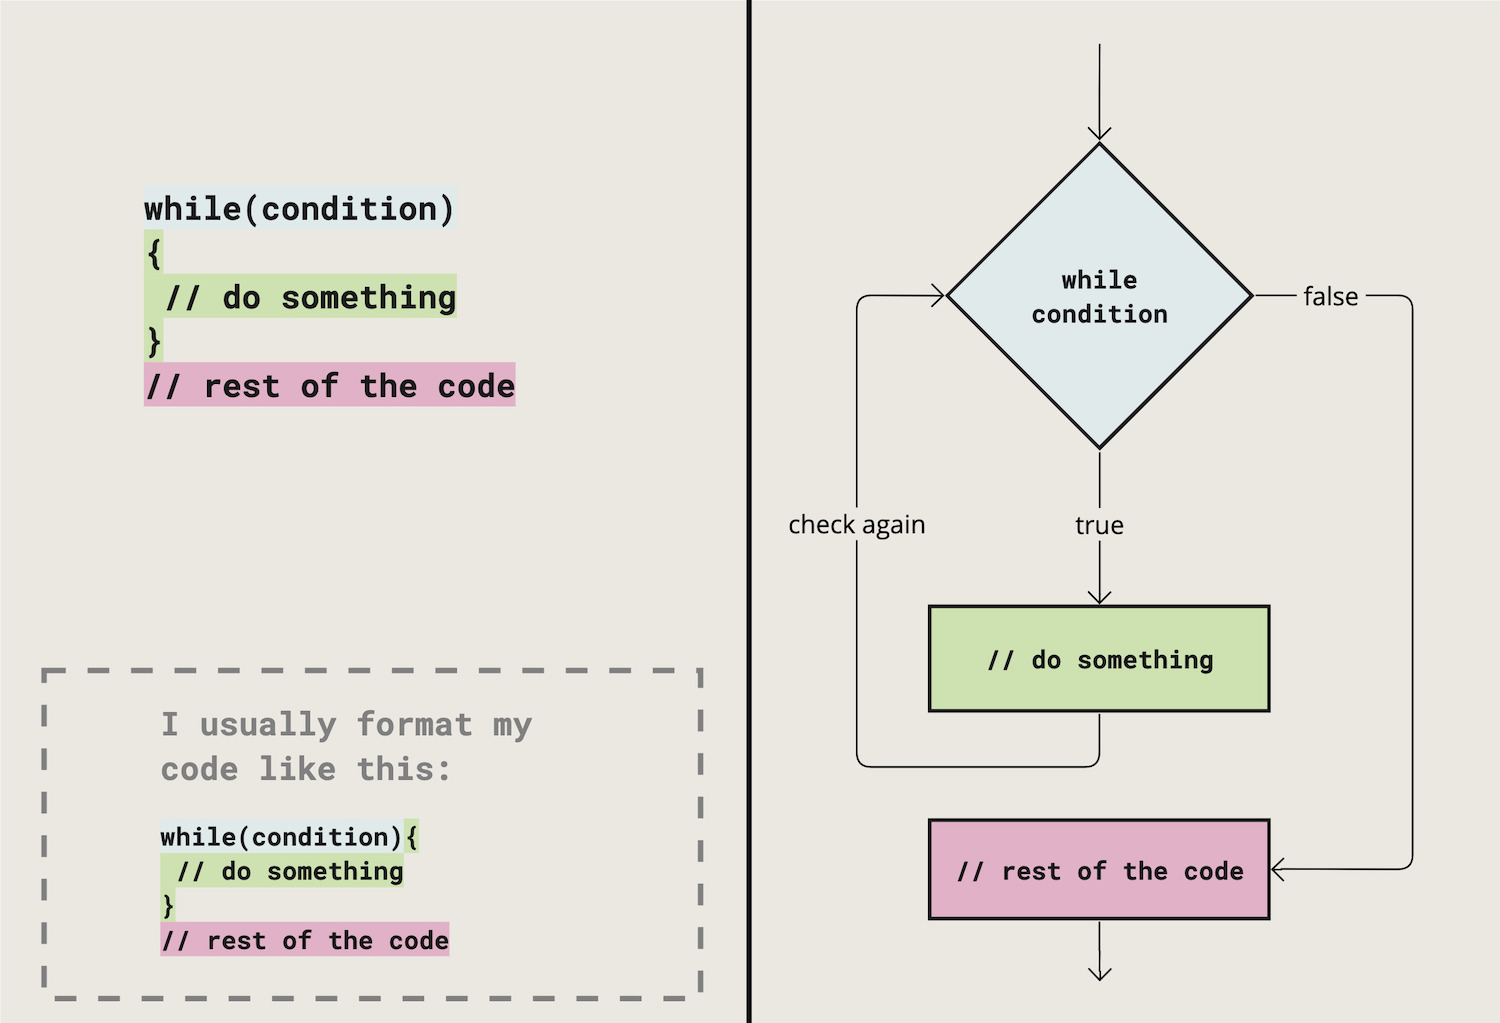
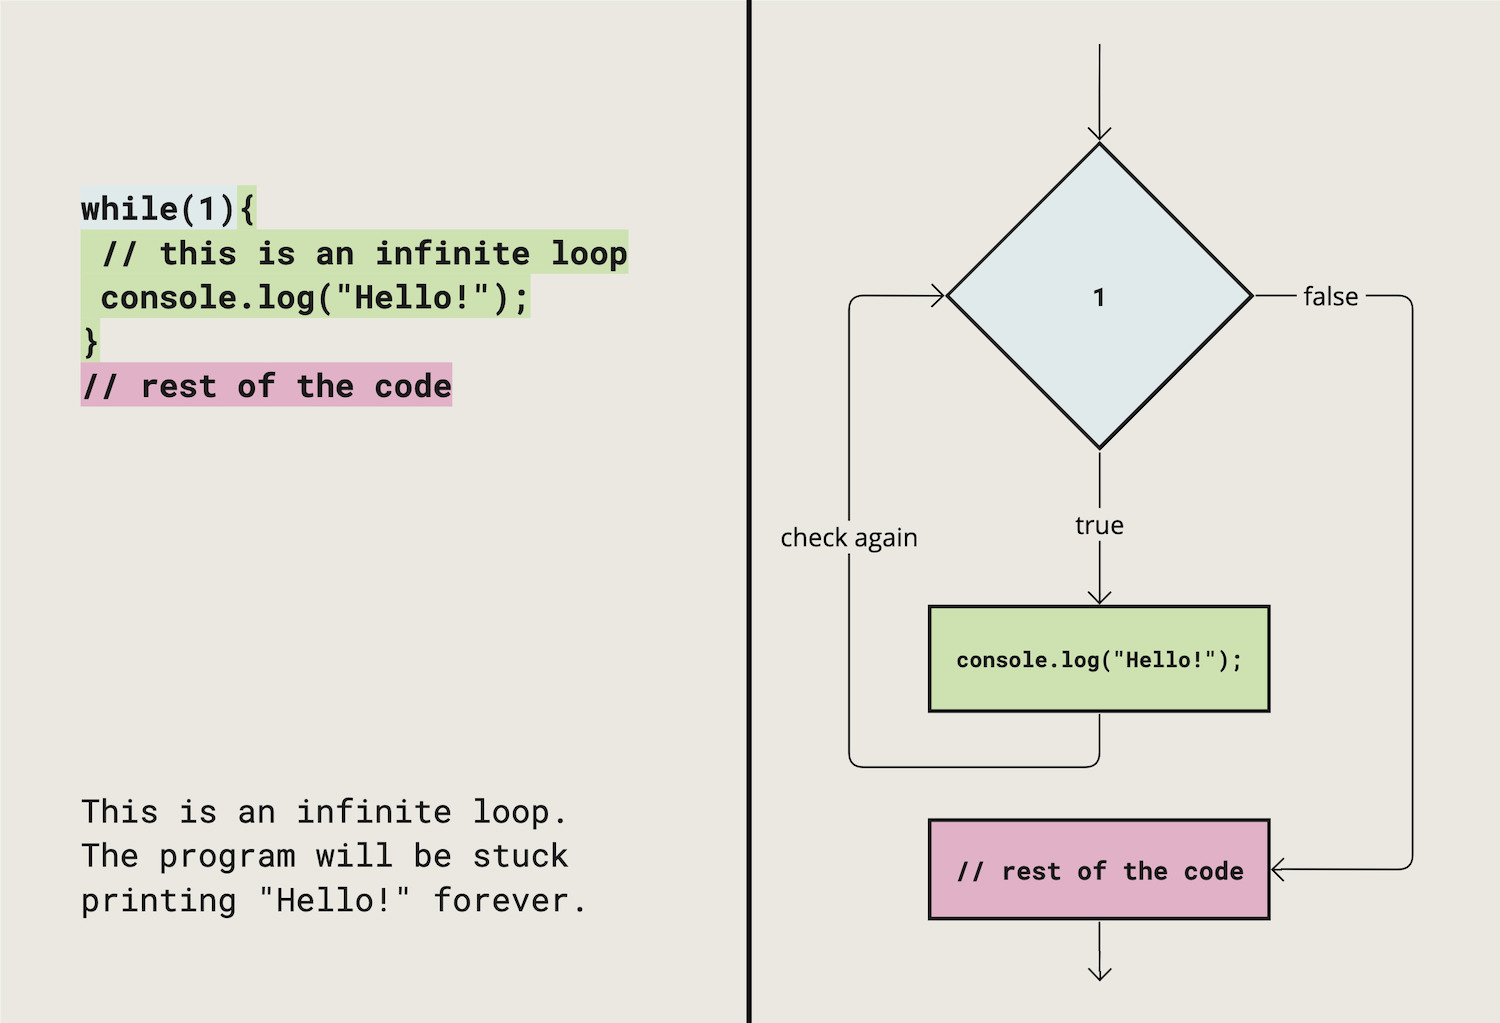
When you use while loops, you always have to provide a condition that will eventually become false. If you don’t, the code will get stuck in an infinite loop and might crash your browser.
The example in the image below will get stuck in an infinite loop. The condition has no way of becoming false.
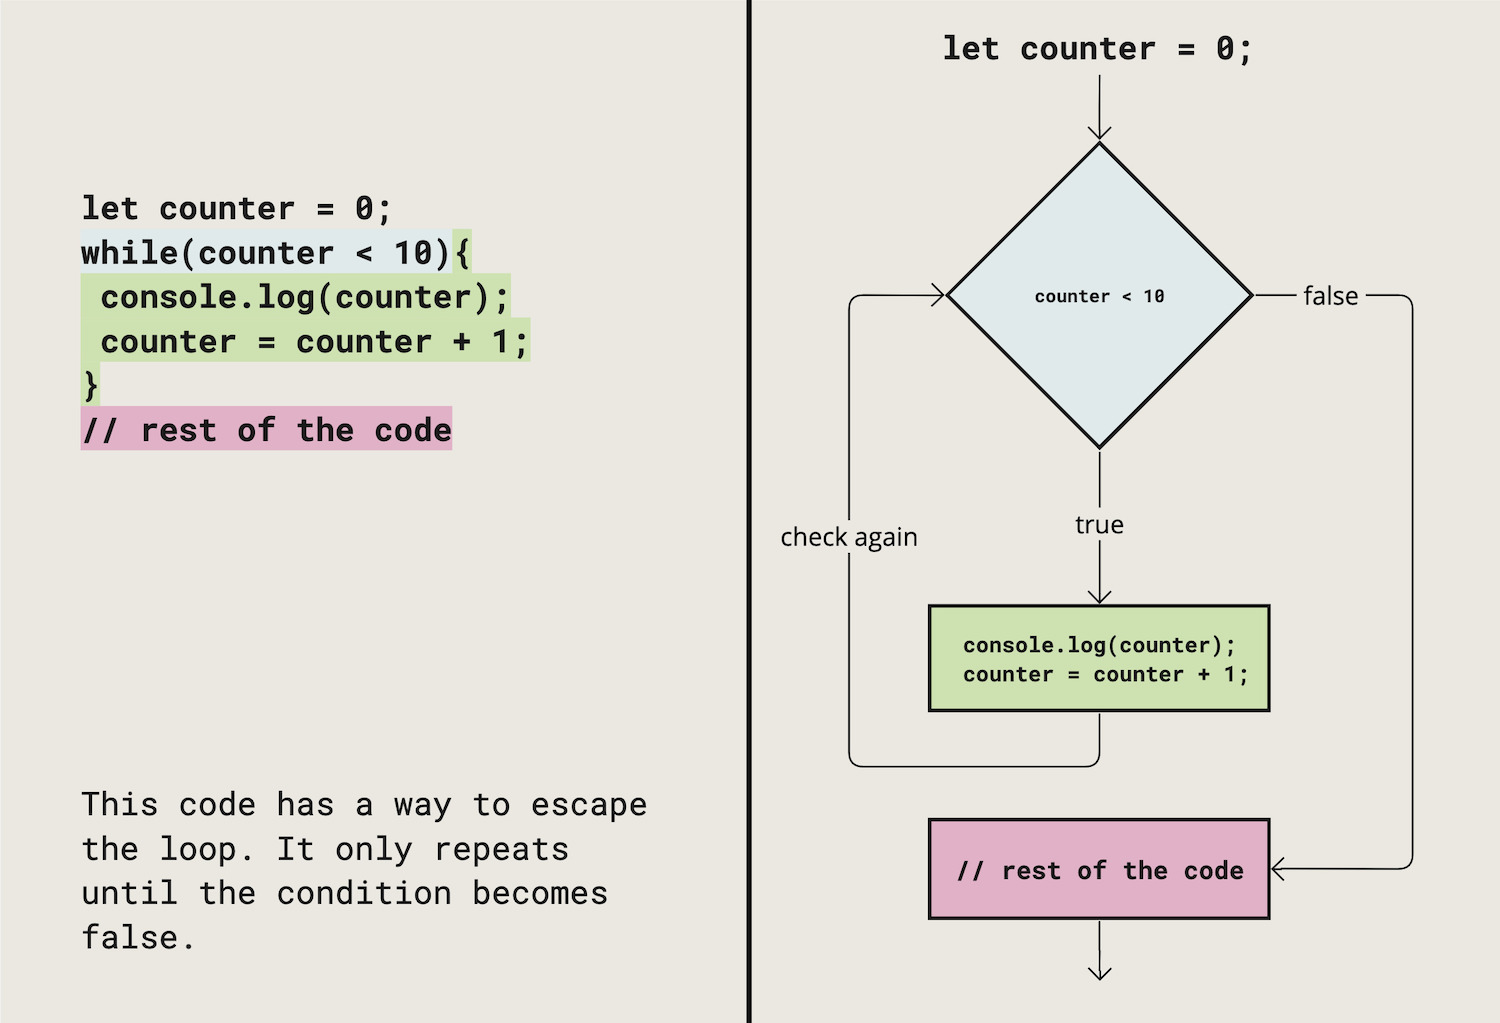
This example has a condition that will eventually become false. counter increases by one on each loop and eventually becomes greater than or equal to 10.
In general, you use the while loop when you want to repeat something, but you do not know exactly how many times you want to repeat it. Some examples of cases like these that you might run into:
- Your program waits for the user to give some sort of input to move on to the next part of your code.
- Your program waits for a device to connect before moving to the next part of your code. You might run into this in the Physical Computing class.
Or you can also use the while loop in a way where you create a specific variable that you control to be able to escape from the loop. How is this useful? Let’s say you wanted to draw a bunch of circles side by side. The way we know how to do it so far, would be just to repeat the same line again and again:
The value for the x coordinate increases by 25 after each circle. If I would want to change the distance between the circles, I would need to adjust this on every single line. Based on what we know so far, this seems like a job for a variable! Let’s see if we can improve our code.
The example below uses a varible called x that we increment after drawing each circle.
Seems like we are getting somewhere but our code seems to become even more complicated! We are also constantly repeating the same lines. There really must be a better way to do this, right?
There is! We can use loops. Here we use the while loop to repeat the two lines of code that we were manually writing multiple times. The condition x <= width tells the code to repeat the loop until the condition becomes false. In our case, the loop repeats until the x becomes larger than or equal to the width of the canvas. Note that we have the declaration of the variable inside the draw function. This is because we want the value of x to reset back to 0 on each frame.
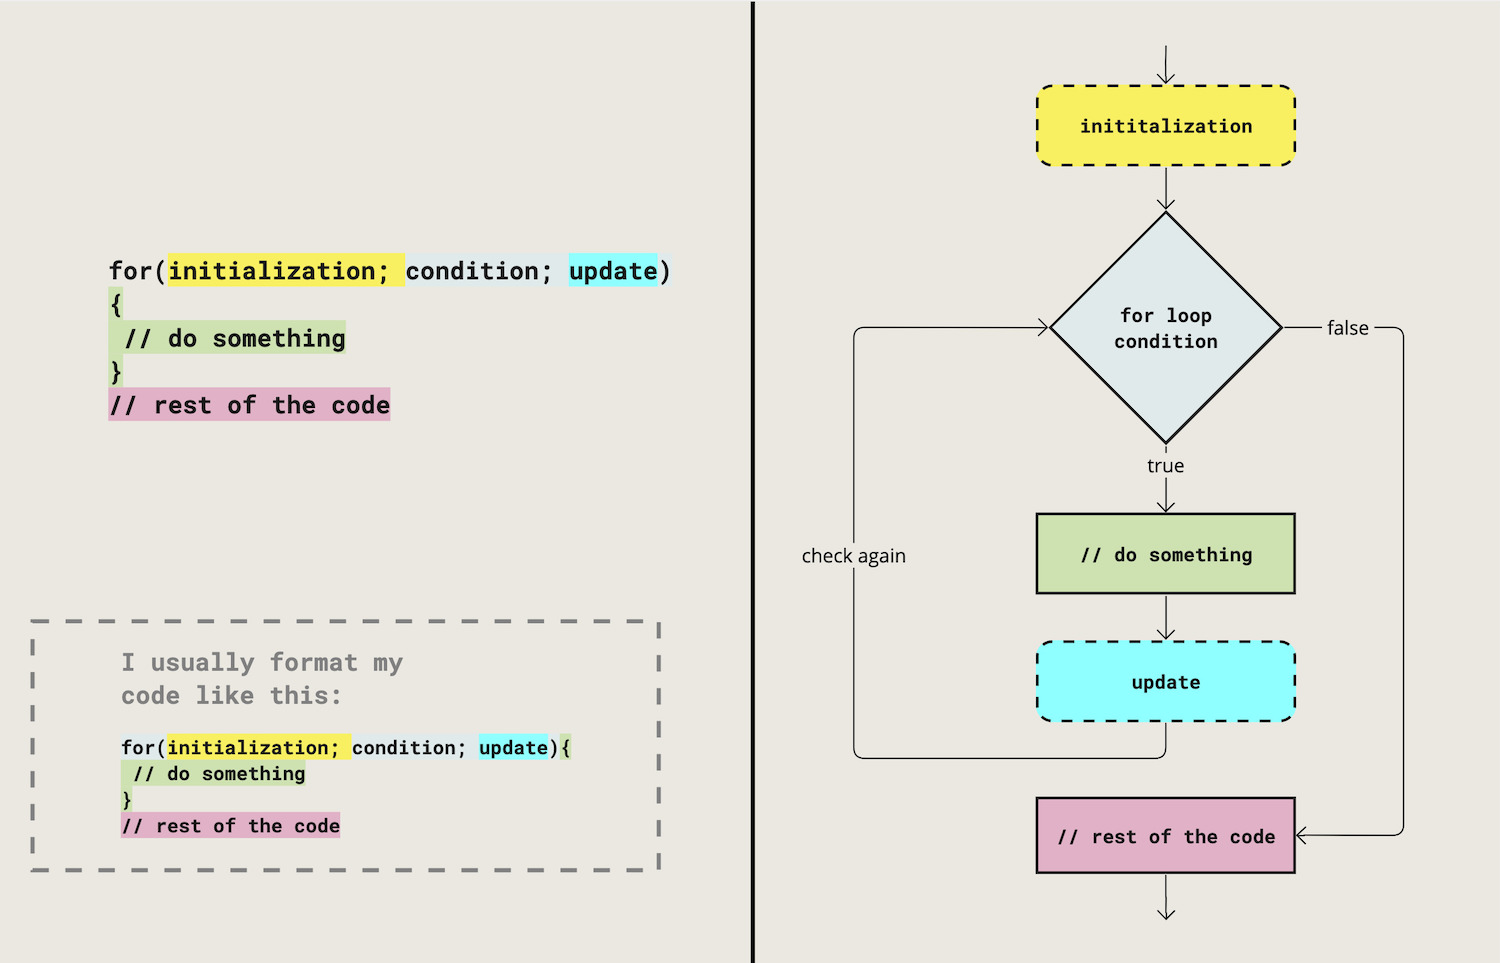
For #
As you can see, when you use the while loop you might often need:
- A variable that you reset in the beginning (initialization)
- An expression that compares that variable to some kind of limit (condition)
- Some kind of update statement that changes the variable. Often you increment this value by some amount. (update)
This is a very common structure and you often end up using it all the time. Therefore, a specific loop exists to do just this. This is the for loop.
for (initialization; condition; update) {
  // code block to be executed
}
initializationis executed (one time) before the execution of the code block.conditiondefines the condition for executing the code block. This is done at the beginning of each repetition of the loop.updateis executed (every time) after the code block has been executed.
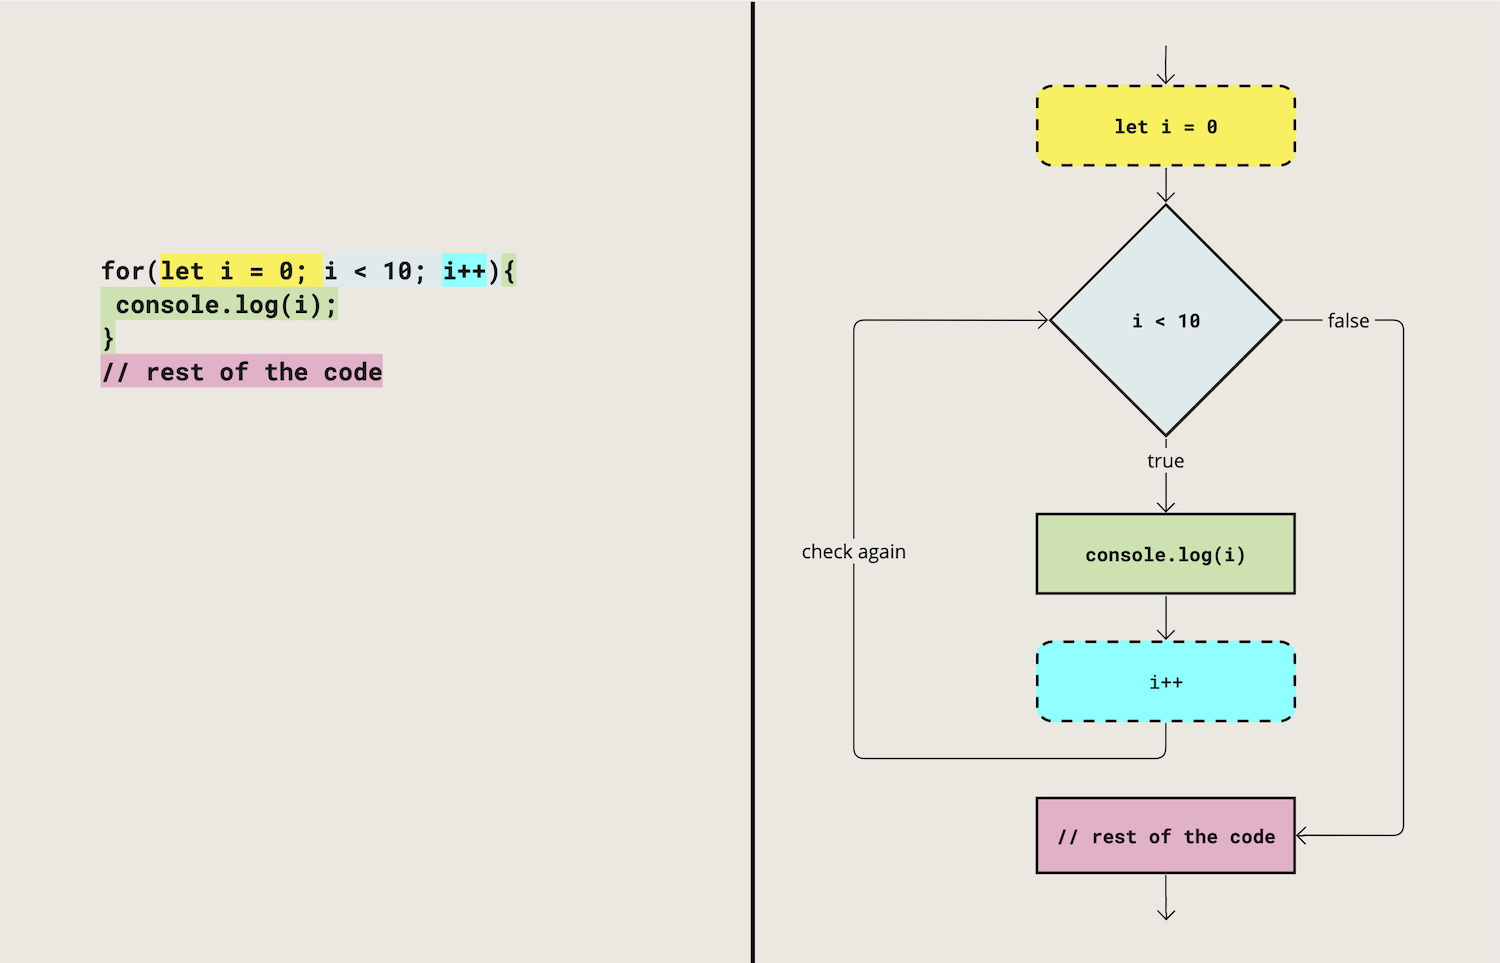
This is a simple example that prints out a number every time the loop repeats.
for (let i = 0; i < 10; i++) {
  console.log(i);
}
Our example with the circles looks like this using the for loop:
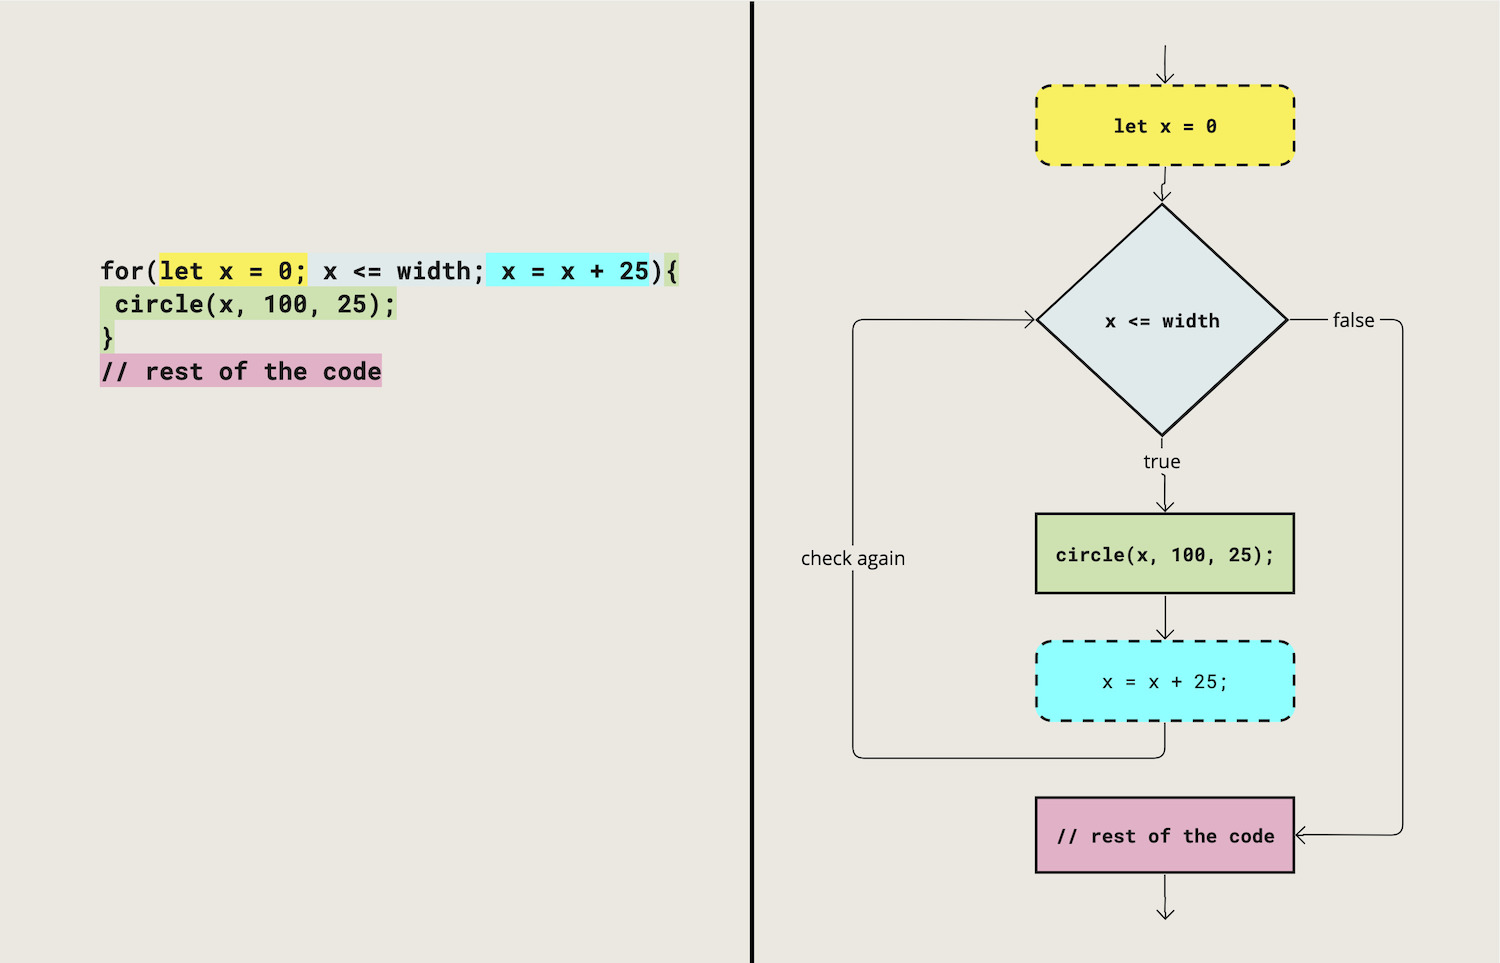
What happens when the loop of our example code runs:
- The initialization is done once:
variable x is created and the value 0 is assigned to it - The condition is checked:
Is x less than or equal to width of the canvas? - If the condition evaluates to true, continue to step 4, otherwise skip to step 7.
- Run the code inside the loop.
Draw a circle - Run the update expression.
Add 25 to the value of x - Go back to step 2.
- Escape the loop and continue with the rest of the code.
You are going to use for loops much often than the while loop. I still wanted to show it and build up to this example, so that you hopefully understand why the for loop is structured the way it is.
Index #
There is a certain way that the for loop is commonly used. The initialized variable is often called i (meaning index). This makes more sense after we learn about arrays, but even without them it’s very helpful to start thinking about for loops this way. The variable name does not have to be called i, but it is a convention that you will see a lot.
for(let i = 0; i < 10; i++){
  // repeat the loop the amount of times in the condition
  // this loop would repeat 10 times, it counts from 0 to 9
  // i++ is the same as i = i + 1;
}
Think of this structure of the for loop as a counter that repeats as many times as the number in the condition expression. In the example above, we count from 0 to 9.
Example: Using the index (i) #
You can then use map() to scale the index into pixels or whatever other range you would need.